- Home
- Basic embroidery stitches
- Blanket Stitch
- Adding a new thread
How to Change Thread in Blanket Stitch Seamlessly
It happens to all of us. You’re in a lovely, relaxing stitching rhythm, and then you see it - the dreaded end of your thread is getting closer and closer.
Don't let it break your flow! Changing threads in the middle of a blanket stitch border is surprisingly simple, and I’ll show you a beautifully neat way to do it. With this method, no one will ever spot the join.
First Things First
This quick guide assumes you're already comfortable with the basic blanket stitch. If you're completely new to it, you might want to pop over to our main guide, How to Do Blanket Stitch, to get the rhythm down first.
And if you're tackling other tricky spots in your project, we also have a full tutorial on stitching perfect corners.
Our Secret Method for Changing Threads
We’ll do this in two parts: first, we'll get the new thread started, and then we'll go back and neatly tidy up the old one.
Part 1: Starting Your New Thread
Step 1: When you have a few inches of your old thread left, just let it hang out at the front of your work for now. Don't snip it yet!
Step 2: Take your new thread and secure it on the back by weaving its tail under a few of your existing stitches.

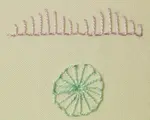
Step 3: Now, bring your new thread up through the fabric (marked 2 on the diagram) leaving space for a new stitch to be created later.
Step 4: Continue making your blanket stitches with the new thread, just as you were before. Make two or three stitches to get it established.
Part 2: Tidying Up the Old Thread
Now that your new thread is on its way, let's go back and give that old thread a tidy finish.
Step 5: Thread your needle with the tail of the old thread. Gently slip the needle under the first loop you made with your new thread. The black arrow on the diagram shows where to take your thread. This is the clever bit that locks them together!
Step 6: To complete the pattern, take that same needle and bring it down through the fabric to create the final vertical "post" of your last stitch (marked 3 on the diagram). This fills in the tiny gap perfectly.
Step 7: All that's left to do is flip your work over, weave this final thread end under a few stitches on the back to secure it, and snip off any excess.
And that’s it! Your border continues in a perfect, unbroken line. It’s our little secret.
Back to Your Relaxing Stitching
See? There's no need to panic when your thread runs short.
With this simple trick up your sleeve, you can carry on with your project, confident that your work is strong, secure, and seamless.
Now, you can get back to the fun part - your creative time.
Happy stitching!
You might like these
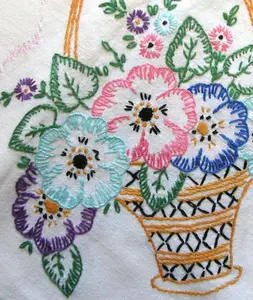
Blanket Stitch Embroidery: Step-by-Step Tutorial and video
How to do blanket stitch in embroidery, step by step with photos and video. Includes variations, plus tips for neat, evenly-spaced stitches.
3 Fun and Easy Blanket Stitch Variations to Learn
Ready to add some creative flair to your embroidery? Learn 3 fun blanket stitch variations! This simple guide shows you how to create the whipped stitch & more
You might like these
Blanket Stitch Embroidery: Step-by-Step Tutorial and video
How to do blanket stitch in embroidery, step by step with photos and video. Includes variations, plus tips for neat, evenly-spaced stitches.
3 Fun and Easy Blanket Stitch Variations to Learn
Ready to add some creative flair to your embroidery? Learn 3 fun blanket stitch variations! This simple guide shows you how to create the whipped stitch & more
Stay connected between projects
If you’d like occasional updates from my embroidery room, including new patterns, gentle tips, and little things I think you might enjoy, you’re warmly invited to join the Stitchin’ Times newsletter.
About Me - Contact Carol - Privacy Policy - Site Map - Testimonials
Please do not copy the content of this site. It is protected by Copyscape.
Copyright © 2006- www.needlework-tips-and-techniques.com All rights reserved