- Home
- Hardanger
Carol Leather — designer, teacher and author with 50+ years of needlework experience, who can still remember the trials of being a beginner.
Hardanger embroidery -
learn how it's done
Hardanger embroidery made an impression on me at a very young age.
As a child, I'd eagerly await visits my grandmother's home. Hurrying to her dressing table, I was enchanted by the exquisite hand-embroidered doilies she'd display.
Those delicate creations usually showcased vibrant florals or charming crinoline ladies. But on one visit, I was met with a surprise - a crisp white mat, its open spaces adorned with the most intricate, lacy stitches. It was mesmerising sight.
As I spent time with my grandmother, I would often watch, enthralled, as she skillfully brought these masterpieces to life with her needle and thread.
Sometimes, she'd let me add a stitch, saying we were creating it together. When she let me join in, I felt a surge of pride, of belonging. She'd smile, guiding my clumsy stitches. Those shared moments of creativity and connection are cherished memories to this day.
When she began her next Hardanger piece, I watched closely, fascinated to learn. Though the details escaped me back then, I marvelled at the delicate lace that seemed to materialise from those carefully snipped threads. I couldn't wait to see the final creation.

She made it look so easy!
I couldn't resist. When Nan stepped away, I grabbed her stork-handled scissors and dove right in, determined to keep going.
Disaster!
I had no idea you had to stitch around the area first before cutting the threads.
Nan never finished that project, and it took me years to work up the courage to try Hardanger embroidery again. But when I finally did, there was no stopping me.
Quick Links to help you navigate this page

How do I follow a hardanger pattern?
Now it's time for me to share it with you
Hardanger embroidery hails from the picturesque Norwegian region that inspired its name. For generations, local women have embellished their aprons, caps, and household linens with these intricate stitches.
Whether you stick to the classic white-on-white or add a pop of colour, the results are always enchanting. The choice is yours - there's no right or wrong way to showcase this beautiful craft.
Once you've completed your project, the possibilities are endless. You could frame it, transform it into a bellpull or coaster, or even craft a delightful Christmas ornament. Or, why not use it to add a touch of warmth and personality to your own dressing table?

While Hardanger designs are often geometric, I love getting creative and designing pictorial pieces like this charming little owl. It still uses traditional stitches, but with a fresh, artistic flair.
The method is just as my grandmother taught me years ago. Start by stitching the satin "Kloster blocks" that form the outer boundaries. Then add decorative surface stitches, like the lovely cable-stitched feathers on the owl's breast.
Now comes the tricky part - using those sharp-pointed scissors! But don't worry, it's simpler than it seems. Just know which threads to cut and which to leave, and you've got it. The final touch is the delicate lace stitches that complete the project beautifully.
I find such joy in blending traditional techniques with a creative, personal touch. It's a wonderful way to honor the past while putting your own unique stamp on a piece. I hope you'll give it a try and discover the satisfaction of crafting something truly special.
Beginners step-by-step Hardanger course
In just six easy lessons, I'll walk you through the basics of beautiful Hardanger needlework.
You'll start by stitching charming little pieces - coasters, cards, bookmarks, and more. As we progress, I'll introduce you to the essential stitches, breaking them down step-by-step.
Just click the images below to see what you'll learn in each lesson.
I know picking up a new needlework technique can feel intimidating, but I'll be right here to support you every stitch of the way. My instructions are designed to be warm, approachable, and easy to follow - like having a crafty friend by your side.
Before you know it, you'll be stitching with confidence and creating lovely handmade treasures. Let's get started on this fun, rewarding journey together!
I can't wait to see what you create.


What threads should I use for Hardanger embroidery?

Ready to try Hardanger embroidery?
Let's look at the materials you'll need. Unlike regular embroidery floss, Hardanger uses two different thicknesses of Pearl cotton. The lower the number, the thicker the thread.
For most fabrics, you'll want to avoid the chunkiest Pearl cotton 3. Instead, pair 5 and 8, or 8 and 12 - this gives the best results.
You can find the finer 8 and 12 threads sold in handy balls.
Use the thicker thread for Kloster blocks and satin stitches. Then work the rest of your design with the finer thread.
Easy, right?
What fabric should I use?
For beautiful Hardanger embroidery, you need an evenly woven fabric. This means the same number of threads running both ways. The thread count can vary, though.
The most common choice is Oslo fabric, with 22 threads per inch. For a more delicate look, try 28 or 32 count linens.
The table below shows the perfect thread pairings for each fabric. Want more details on Hardanger-friendly embroidery fabrics? Just click the link to my dedicated page
22 count Oslo - Pearl 5 and 8
28 count evenweave - Pearl 8 and 12
32 count Linen - Pearl 12 only
Hardanger Stitches


What else will you need?
Tapestry needles
You need two needle sizes, one for each thread. Try a size 20 for the Pearl number 5 thread, size 22 for the Pearl number 8, and a size 24 for Pearl 12.
Sharp scissors
Sharp-pointed embroidery scissors are necessary for cutting the threads. Those with angled blades make life a little easier.
Embroidery hoop
I recommend you use an embroidery hoop while working on surface stitches. Remove it before cutting the fabric threads and doing the needleweaving.
Light to work by
A magnifying lamp proves useful in preventing eye strain when stitching in low light.
Tweezers
A pair of pointed tweezers may also come in handy for teasing out the cut fabric threads.
Small pot
A container in which to pop the cut threads helps to keep your working area tidy.
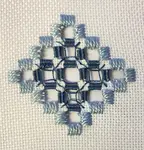
How to follow Hardanger patterns
This is a special type of counted whitework embroidery that uses a chart to guide the placement of stitches.
The chart uses a grid to represent the fabric threads, and larger designs may use a line to represent two threads, making the pattern smaller and easier to manage.
A handy guide explains the symbols, allowing you to quickly identify where each stitch needs to go, saving time and frustration.
What if I cut the wrong thread?
As a little girl, I learned the hard way that cutting the wrong threads can be devastating. But don't worry - there are easy ways to fix minor mistakes.
Just keep those scissors away from little hands, especially curious kiddos who love stitching!
To help you avoid errors, my charts have special red lines to show you exactly which threads to snip and which to leave be. Easy peasy!
Now, remember to take a deep breath before you start cutting. I can't tell you how many times I've seen folks forget this crucial step. Just slow down, relax, and you'll be stitching like a pro in no time.
You've got this, my friend. I believe in you! Let me know if you have any other questions - I'm always happy to lend a helping hand.
For your bookshelf
If you want to learn more about Hardanger, the following books by Janice Love will prove indispensable...
Hardanger Basics and Beyond
Fundamentals made Fancy
Do you have a question about Hardanger embroidery?
Whether you are a beginner to Hardanger embroidery or you have been stitching it for years, this is the place to ask for help or share your knowledge.
What Other Visitors Have Asked
Click below to see contributions from other visitors to this page...

Cutting and Wrapped Bars with Dove's Eyes 
Please help me as I am stuck. I took photos of the picture of the finished product, instructions and my project at this point. I am unsure as to where …
Double or alternating stem stitch
Hi can you please show me how to turn a corner using double or alternating stem stitch. It is inside the four-sided stitch border.
Creating a heart
I want to create a special heart-shaped patch that can be sewn onto a cushion.
This cushion will hold the wedding rings of my grandsons parents, secured …
Can I change to a different fabric count for Hardanger?
I have a pattern calling for 28 count cloth. I have lots of 22 count cloth and must use it. How would using 22 Cloth instead of the 28 Cloth the pattern …
hardanger patterns on paper
I want to do hardanger on paper and will use stitches only, no cutting out. Should I use embroidery cotton and can I use a small hardanger pattern to put …
Repairing cut threads in hardanger
I am busy embroidering a hardangar Tea with a beautiful border.
I cut 4 threads on the one side of pattern incorrectly. I used the same fabric threads …
cleaning hardanger embroidery
My aunt made some lovely hardanger pieces for me but over the years they have become soiled...how do i clean them without ruining them?
Hardanger Tablecloth Pattern
I am wanting to make a table cloth (fairly big) for my brother and his wife for their 25th wedding anniversary as a gift. I would like to make it in white …
Repair a mistake on hardanger
I found a 45 inch square harndanger table cloth in my archives that I started some 10-15 years ago. Now want to finish it but see why I stowed it away. …
How to Fix Hardanger Cutting Mistake
I've done hardanger before without any problems so when I started my piece I didn't review any tips or tricks. (OK, it was 15 years ago, but I look at …
You might like these
Learn Hardanger Needlework | Step-by-Step Beginner Lesson 1
Start your Hardanger needlework course today. Free patterns and detailed instructions in this beginner-friendly lesson. Part 1 of a series of 6 lessons.
Stay connected between projects
If you’d like occasional updates from my embroidery room, including new patterns, gentle tips, and little things I think you might enjoy, you’re warmly invited to join the Stitchin’ Times newsletter.
No pressure. Just a friendly note now and then to keep you inspired.
Copyright © Carol Leather - 2006-2024
About Me - Contact Carol - Privacy Policy - Site Map - Testimonials
Please do not copy the content of this site. It is protected by Copyscape.
Copyright © 2006- www.needlework-tips-and-techniques.com All rights reserved