- Home
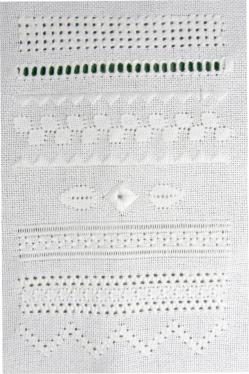
- Whitework Sampler
White work sampler part 1
If you're a curious beginner, this white work sampler serves as an excellent starting point, introducing you to a multitude of techniques that fall under this all-encompassing term.
Exploring the delicate and intricate world of whitework embroidery may seem daunting at first, but with the right guide, it can turn into a delightful adventure.
Discover the beauty and satisfaction that comes from creating something truly exquisite with your own hands.
At first, I exclusively shared this taster with my newsletter subscribers, but now it's your turn to dive in and give it a go.
You will need:
- 12 x 12 inch piece of white 28 count evenweave (the original model was stitched on Brittney) or linen fabric
- Perle no 8 thread in white - 1 ball
- A size 24 tapestry needle
- An 8 inch Embroidery hoop
- Sharp, pointed embroidery scissors
Finding the starting point
To get started, let's prepare the fabric.
- Take one edge and fold it over to meet the opposite edge, making sure the fold is along the fabric's length.
- Identify the top edge of your now-folded fabric.
- From this edge, measure downwards along the fold line a distance of 4 inches.
- At the 4-inch point, place a pin directly into the fabric to mark the spot. This pin marks the central point of your first row.
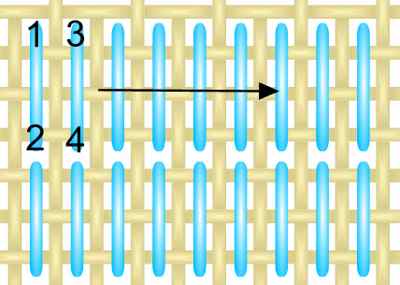
- Now count 36 fabric threads to the left, bringing you to the green dot marked with a number 1 inside the fourth square in the top row, on the grid below. This is where you will start stitching. I suggest you mark that point with a dot using a disappearing ink pen or an HB (#2) pencil.
With your starting point marked so you can easily see it, place your fabric in a hoop to make it easier to keep consistent tension on your stitches.

The stitch diagram
Remember that green dot? It corresponds to the beginning of stitch one in the diagram provided below (this time drawn in blue). Each stitch you take will be worked over 3 fabric threads either horizontally or vertically. The thread will be carried across the back side of the fabric diagonally.
I've coloured the stitches in each of the first four rows. This will make it easier for you to see where you're going. These colours do not relate to the thread, which will be white throughout, they are just to help guide you.
As you work, remember to pull firmly on the thread to "scrunch up" the fabric threads. This will create small holes at the beginning and end of each stitch.

Starting to do the pulled thread work - rows 1 to 3
Bring the needle up on the left side of the first stitch, cross three threads to the right and take it to the back of your work.
Return the needle to the left, three threads below the starting point, for stitch two. Reuse the initial hole to finish that stitch.
While you're stitching, you'll notice the thread trailing behind forming diagonal lines, as we discussed before.
To continue your stitching, bring the needle back up in position for your third stitch, following the direction of the arrows and pulling firmly. Take the thread back down in the same hole that stitch two came out of.
Repeat this process until you reach stitch eight, ensuring that pull firmly after each stitch.
To start the second row of your stitching project, you'll need to carry the thread diagonally from eight to nine (which is highlighted in pink on the diagram). From there, you'll continue working up the row with vertical and horizontal stitches on the front of your work and diagonal ones on the back as before.
When it's time to move on to row three, simply follow the numbered stitches on the diagram and begin again in the same way as before.
There is a change in row four
As you begin row four of your white work sampler, there's a small but important difference to note.
After completing stitch twenty five, take a moment to turn your work over and slip your needle through the back of stitch twenty four. This simple step helps prevent any thread carried across the back from showing behind the hole at the end of stitch twenty five, ensuring a clean and neat finish.
Once you've done this, bring your needle back up in position for stitch twenty six and continue on with your project as before. By taking care with these small details, you can improve the quality of your stitching and create a truly impressive final product.
So take your time and pay close attention to the details - it will be well worth the effort in the end!
The final steps for this band
To complete the first band of your white work sampler, there's one final step: turn your work upside down and rejoin your thread behind the existing stitches. This will allow you to fill in any missing stitches and square up the end of the block.
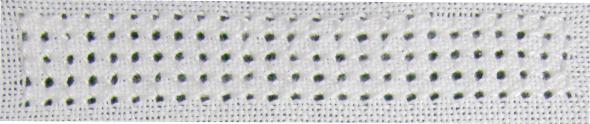
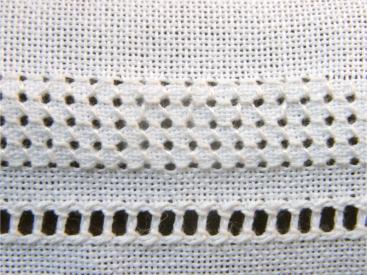
Once you've completed this step, take a moment to admire your stitching - it should look similar to the photograph below (minus any mistakes you may have made along the way). Can you spot where my tension is wrong?
Congratulations on completing this portion of your sampler!
The next part of your white work sampler
In our next session, we will be exploring the art of drawn thread work and simple hemstitching.
For those who may be unfamiliar with these techniques, it's important to note that they are often confused with pulled thread work. However, by completing a straightforward band using drawn thread work, you'll gain a better understanding of the differences between these methods.
So join us for our next lesson and expand your embroidery skills with this beautiful and intricate technique.
Return to top of white work embroidery sampler
Go to band 2 - drawn thread work
Go to band 3 - satin stitch border and pulled double back stitch
Go to band 4 - diamond eyelet stitch
Go to band 5 - honeycomb stitch
Go to band 6 - three sided stitch
Move on to band 7 - diagonal 4 sided stitch
Learn more about whitework embroidery
You might like these
Band 5 of the white work embroidery sampler
Are you stitching along with my white work embroidery sampler? Come on, join in, and learn new needlework techniques with us. Its free!
Pulled thread work - sampler band 3
Combining stitches is common in pulled thread work. For this third band in our free whitework sampler we will use satin stitch with pulled double back stitch
Drawn thread work - Whitework sampler band 2
We will learn drawn thread work in band 2 of our stitchalong whitework sampler. Find out the difference between pulled work and drawn thread needlework
Copyright © Carol Leather - 2006-2024
About Me - Contact Carol - Privacy Policy - Site Map - Testimonials
Please do not copy the content of this site. It is protected by Copyscape.