- Home
- Pulled Thread
An introduction to pulled thread embroidery
So you've been embroidering for a while now and are ready to learn something new?
You might like to try pulled thread embroidery which is a form of counted thread embroidery that does not involve cutting the fabric threads. It is sometimes called drawn fabric or pulled work, but not drawn thread work which is a different technique where the fabric threads are cut and withdrawn.
Instead, tension is used when working the stitches to draw the fabric threads together to produce a lacy effect.
Materials required for pulled thread embroidery
The tools you will need to create pulled thread work comprise of...
- a single colour of thread (to match the fabric as closely as possible)
- blunt pointed tapestry needle
- a suitable fabric
- and an embroidery hoop, or frame, to hold your work taut
You need to use a loose, evenly woven fabric to create your pulled thread work so that the fabric threads are easily moved to reduce the risk of breaking them due to the tension required.
Historical pieces were sometimes worked on 50 count linen or cotton, but it is more common to use 28-36 count nowadays which is certainly easier on the eyes.
Threads used need to be good quality and strong enough to withstand the strong tension, such as crochet thread, lacemaking threads or pearl cotton. Normal embroidery floss does not lend itself to pulled thread work.
If you don't have any suitable thread, you can always use the fabric itself! Just unravel threads from the edge of a spare piece of fabric and stitch with them.
Of course, the thickness of the thread and the colour will then match exactly! This is important as the design will be formed from the gaps which are created when the fabric threads are pulled apart, not the stitches themselves.
Getting ready to start

Place your fabric in your embroidery hoop ensuring the threads are lined up at right angles and are clearly visible for counting. DO NOT stretch the fabric too tightly in the hoop as you will need some give in order to position your needle easily.
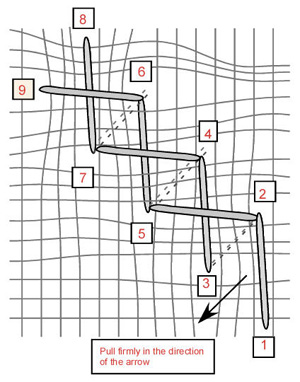
Starting and finishing your threads needs to be done with care, as stray threads can show behind the openwork embroidery.
One way to avoid this is by using the hoop to trap the beginning of the thread under the top part of the hoop, so it can't accidentally be pulled out of the fabric when starting the stitching.
To fasten off, release this thread later and carefully pass it through the solid areas where the threads have been pulled together on the back of the work.
Pulled thread stitches
A variety of stitches are used in pulled thread embroidery, some of which are similar to those used for other counted thread embroidery techniques, but when worked with tension they give a very different effect.
These stitches include...
- Cable (also used in Hardanger embroidery)
- Cobbler (this stitch resembles window panes)
- Diagonal raised band (forms a diagonal ridge)
- Diamond eyelet (creates a separate motif)
- Honeycomb (creates a raised triangular pattern)
- Pulled double back (solid alternating squares )
- Pulled satin (can be worked over differing numbers of fabric threads)
- Ringed back (a row of circles)
- Three sided stitch (a dense line of alternating holes)
- Four sided stitch (again often used in Hardanger)
Composite stitches are built using two or more, worked in conjunction to create a different effect.
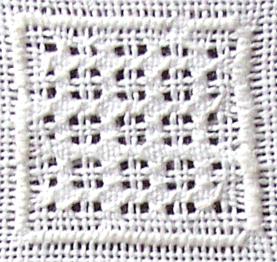
One thing to keep in mind, is that the way the stitches are shown on a chart may not match how they look once they are worked. Honeycomb is a good example of this, as it resembles brick work when charted out rather than triangular.
Surface embroidery stitches (not pulled) can also be used in this type of needlework.
Ready to try pulled thread embroidery?

I have put together two free pulled thread embroidery projects to get you started.
First there is a simple design using just two stitches which can be mounted in an aperture card or made into a coaster. You will find the pulled thread instructions here.
Then, when you are a little more confident, you can stitch a band sampler while trying out the pulled thread stitches listed above.
This sampler is broken up into seven lessons and was originally released as a stitch-a-long in my newsletter. One band of the sampler is worked in drawn thread embroidery, which will help to show you the difference in effect and technique.
You might like these
Pulled Work Embroidery Beginner's Guide: A Simple Free Project
Pulled thread embroidery guide for beginners. Learn two different stitches to create a lacy pattern. Step-by-step preparation, stitching and finishing.
Whitework embroidery stitches
Learn how to do whitework embroidery stitches with Carol Leather. Here we cover cobbler stitch used in pulled thread embroidery (also known as drawn fabric)
4 sided stitch - learn how to work this simple pulled thread stitch
4 sided stitch, worked diagonally, completes the last band of our whitework sampler

Copyright © Carol Leather - 2006-2024
About Me - Contact Carol - Privacy Policy - Site Map - Testimonials
Please do not copy the content of this site. It is protected by Copyscape.