- Home
- Intro to blackwork
- Blackwork Embroidery
BLACKWORK TUTORIAL
Blackwork Shading: 2 Easy Techniques (With Free Pear Pattern)
Master the art of adding depth and dimension to your blackwork embroidery
Blackwork embroidery, a counted thread embroidery, is often stitched with black thread on a white evenly woven fabric, but adding some colour can really make the design stand out.
This embroidery technique is sometimes called Spanish blackwork or Elizabethan embroidery.
The pears in this article will allow us to explore how the addition of extra stitches within a pattern can add depth and shading, as can using more strands of floss in the needle.
If you haven't tried blackwork before, you might find my Blackwork for Beginners ebook helpful, to teach you the basics.
Get the Printable Pears Chart (PDF) — Free
Clean, ad-free download you can print and stitch from.
Get the Printable Pears PDF (Free) →
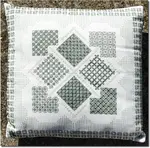
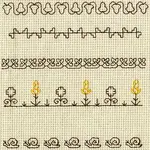
The completed blackwork pears design
Design Specs
You Will Need
How to Use the Chart
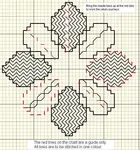
Black arrows along the top and left-hand side of the chart mark the mid-points, and if you follow the red lines across you will find the centre of the design.
Fold your fabric in half both ways and press to form a crease that temporarily marks the centre.
If you count up 12 lines from the centre of the fabric and then 3 to the left you will be in position to begin the bottom cross stitch of the right-hand stem.
Cross Stitching the Stem
Work the stem of the pears in cross stitch using two strands of embroidery floss. If you have not done cross stitch before, you might find my beginners tutorial helpful.
Stitching the Outline
Blackwork embroidery is easiest if you work the outlines first, using 2 strands of floss, in either a backstitch or double running stitch (also known as Holbein stitch).
If you are confident with your counting, you can start your thread with the loop method, otherwise I suggest leaving a tail which you can fasten off later. This way you can undo your work from the beginning if you make a counting mistake that you don't notice immediately.
Working the Blackwork Repeating Pattern
I suggest using 1 strand of embroidery floss to give a delicate appearance to the geometric blackwork pattern. You might find these referred to as diaper patterns in older publications such as the classic book by Elisabeth Geddes called Blackwork Embroidery that was reprinted in 1976.
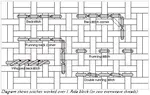
We will treat each "flower" on its own and then move on to the next in a diagonal row. Diagram A shows the first "journey" around the flower, working every other running stitch. For the moment, ignore the centre of the flower.

Next, go back around the flower, filling in the missing stitches. This time pop in the horizontal and vertical stitches that meet in the centre of the flower, as in Diagram B.

When you complete each flower, move on to the next in that diagonal row. Use the outlines to carry the thread from one row to the next. You can weave under the outline stitches for a short distance without it becoming too obvious on the back of the work.
Shaded Blackwork Areas
To add shadow and depth to the design, shade some areas by adding extra stitches to the blackwork embroidery using two strands of floss.
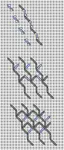
Tackle these in two stages. Some flowers have extra stitches in their centres. Work these at the same time as the flowers as shown below.
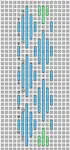
The photograph, worked in red thread, shows 3 completed flowers and the initial steps of the fourth. The additional stitches are placed in the centre.


Finally, we have the "squares" in between our flowers in places. Follow the chart carefully and stitch some completely and others only partly.
To stitch these you can either make four cross stitches and box them in or work them entirely in Holbein stitch.
Prefer a printable? Get the Pears PDF (Free) →
Ready to Try More Blackwork?
Now that you've mastered the basics of blackwork shading, there's a whole world of patterns and techniques waiting for you.
Every stitch teaches you something new.
Every pattern builds your confidence.
Blackwork for Beginners
If you loved this tutorial, my ebook takes you deeper — with 8 clear patterns and step-by-step tips for a neat, reversible back.
Find Out More →You might like these
Blackwork for Beginners Book: Get a Neat, Reversible Back
Messy backs on your blackwork? This step-by-step book teaches the proven method for neat, reversible results. 8 guided projects. Instant download, £9.95.
Waste Canvas — How to Use & Remove (Step-by-Step Guide)
Take your needlework to the next level with waste canvas: Transform your clothes into one-of-a-kind statement pieces
Blackwork Embroidery: Free Lessons, Patterns & Complete Guide
Explore blackwork embroidery with 5 free lessons, downloadable patterns for all levels, and a complete guide. From Tudor & Spanish origins to modern designs.


Stay connected between projects
If you’d like occasional updates from my embroidery room, including new patterns, gentle tips, and little things I think you might enjoy, you’re warmly invited to join the Stitchin’ Times newsletter.
About Me - Contact Carol - Privacy Policy - Site Map - Testimonials
Please do not copy the content of this site. It is protected by Copyscape.
Copyright © 2006- www.needlework-tips-and-techniques.com All rights reserved