Tips for stitching blackwork fill patterns

Blackwork fill patterns may seem complicated, but they can actually be quite simple with the right approach. Before starting, it's helpful to study the pattern and plan out your stitching journey.
Plan your Journey
Before you start stitching blackwork fill patterns, it's helpful to study them carefully and plan out your stitching path. Think of it like taking a journey from point A to point B, with a few detours along the way.
Some patterns may require using back stitch, but for others, you can use a double running stitch to make the back of your work look just as good as the front.
Try to identify the vertical, horizontal, and diagonal lines in the pattern and see if there are any isolated stitches you can work on at the same time as the rest of the pattern. With a little planning, blackwork can be simple and relaxing to stitch.
Some patterns are easier to make reversible than others, but don't worry - we've got some examples to get you started. Just remember that you need to use a continuous line without any separate crosses or boxes in the pattern.
The following patterns are simple to stitch ...
Arrows and Diamonds Pattern

For the Arrows and Diamonds pattern, start at the top and work down to the right in a diagonal for the first row.
Weave your thread under the outline when you come to the edge of the shape you are filling, then bring it up ready to start the next row.
Once you have all your "vertical" rows in place, switch to working horizontally.
This pattern gives an area of medium to dark density and is easy to work, if a little time-consuming due to its small size. For this reason it is most suitable for small areas of a design.
The back will present a different pattern to the front of the work.
The diagram shows the stitches you will be working for each row in blue (to make it easier) however, you will be using a single coloured thread.
Paper Boats

The next guide will show you how to stitch a blackwork pattern called "Paper Boats".
It's a simple repeating pattern, worked in a single strand of embroidery floss or silk, that gives a medium tone to the stitched area.
The instructions use double running stitch to avoid any unsightly shadowing showing through from the back of the work.
Follow the step-by-step instructions in the diagram to fill the area. The pattern is easy to learn and can produce stunning results with relatively little effort.

Work row 1 from left to right, following the red arrows.
Work row 2 from right to left, the stitches you will add are shown in pink.
Continue adding the remaining rows to complete your little boat shapes.
To achieve a different effect, you can add vertical rows of running stitch, as shown in the front and back views in the photos below.


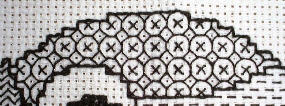
Chicken wire pattern

This pattern is worked in multiple rows or journeys. Each stitch goes over two evenweave fabric threads or one block of Aida.
Row 1 - Start at the blue dot and use running stitch to work from left to right across the area.
Row 2 - Add stitches to fill in the gaps in the previous row, going from right to left.
Continue working in this way, adding the blue colored stitches in the diagram, until you have completed all of the rows.
If you wish to add shading to the pattern you can add cross stitches in the centre of each octagon. To make it even more dense and dark you can outline the crosses to form squares.
Compensating stitches
Sometimes you reach the outline of a shape and cannot complete a whole repeat of the fill pattern. Don't worry. Just stitch as far as you can and then return along the row.
The part patterns use what we call compensating stitches. You can see them inside the outlines of the little owl design above.
It is best to start stitching across the widest or longest part of a design so you can get into a rhythm before reaching an outline that disrupts the pattern.
I frequently leave these compensating stitches until later, preferring to continue the pattern sequence without interruption.
TIP: Where your fill pattern touches the outline, carefully maneuver the point of the needle around to enable you to keep the pattern inside where it belongs. If you inadvertently bring the needle up on the outside, it may pull the outline out of shape.
Blackwork pattern and tone
As most blackwork is monochromatic, tonal contrast is essential. Using the right tones can make or break a design.
You could compare blackwork with a pen and ink drawing, where you build up tones with lines and cross-hatching.
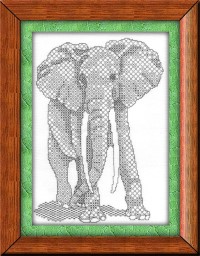
You may even solidly ink in the darkest areas of a drawing; an effect that you can imitate in a blackwork design by using cross stitch. Leaving the lightest areas empty by comparison, can create contrast. I have done this for the tusks on my blackwork elephant pattern.
If your stitches are closer together, a pattern will appear darker than one where you leave spaces in between them.
You need to use some patterns in a large area to show off the full effect, whilst others would take a long time to stitch if used for anything other than a small section of a design.
Choosing a suitable blackwork fill
It is also a good idea to use fill patterns that are in keeping with the subject being stitched. For example, a pattern that looks like leaves would look as strange on a fish as scales would on a tree!
Good blackwork designs take this into account, and even if you are not aware of it, the patterns do not look out of place.
I hope these tips will help you when working blackwork fill patterns.
You might like these
Explore Blackwork Embroidery Patterns with Rich Stories
Explore my blackwork designs, where intricate patterns and rich stories intertwine. Discover the inspiration, process, and unique features behind each design
Make a bookmark with a Celtic embroidery pattern
A treat for lovers of Celtic embroidery. This little free blackwork bookmark is quick and easy to make as a gift, or for yourself
An introduction to blackwork embroidery by Carol Leather
Learn how to do blackwork embroidery with Carol Leather. Find instructions, patterns and ideas for this, and lots of other types of needlework
Copyright © Carol Leather - 2006-2024
About Me - Contact Carol - Privacy Policy - Site Map - Testimonials
Please do not copy the content of this site. It is protected by Copyscape.