STUMPWORK TUTORIAL
Stumpwork Bunny in a Basket: Your First 3D Project
A gentle step-by-step tutorial that walks you through padding, slips, wired edges, and needleweaving — all in one small project you can finish and be proud of
If you’ve been looking at stumpwork and thinking “I’d love to try that, but it looks so complicated…” — this is the project that changes your mind.
This little Easter bunny in a basket uses four core stumpwork techniques: padding with felt, creating slips, wiring freestanding edges, and needleweaving. But you’ll learn each one as you go, in a design small enough to mount in an aperture card or frame when you’re done.
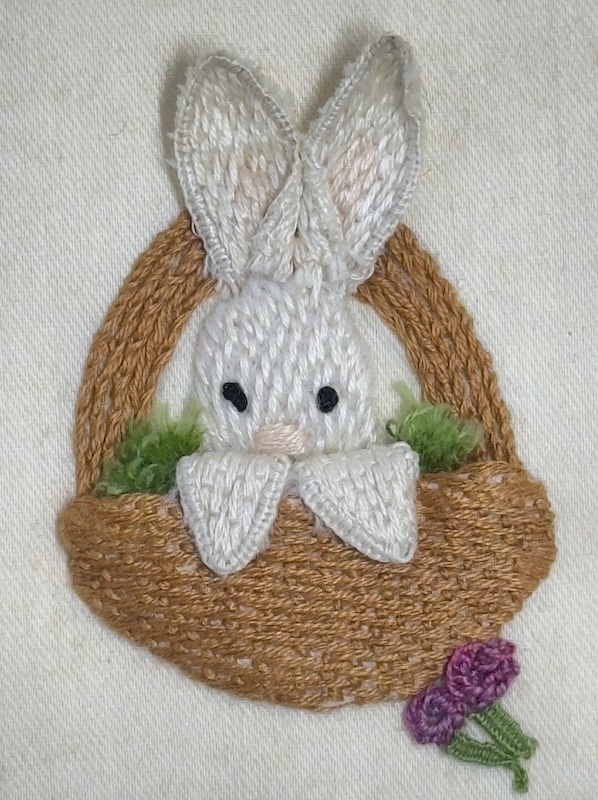
The finished bunny — he’s about the right size for a greeting card
No previous stumpwork experience needed. If you can work basic embroidery stitches — chain stitch, long and short stitch, and buttonhole stitch — you have everything you need to make this bunny.
For an overview of the stumpwork techniques we’ll be using, see my stumpwork embroidery guide.
What You’ll Need
A short supply list — nothing exotic. You probably have most of these already.
Materials for the Bunny
- 8-inch (20 cm) square of background fabric
- 6-inch (15 cm) square of unbleached calico or muslin
- Firm sew-in interfacing (the kind used to stiffen collars)
- White and fawn felt
- Size 32 paper-covered florist’s wire
- Floss (stranded) in white, peach, black, brown, green, and a flower colour
- Crewel needle
- Paper cutting scissors
- Pencil
- 5-inch embroidery hoop
- A stiletto or sharp pointed object
Embroider the Handle
We start at the top, with the basket handle. This is the only part of the design that sits flat against the fabric — everything else will be built up and over it.
Chain Stitch Handle
Trace the handle outline from the pattern sheet onto your background fabric, positioning the ends at the centre mark.
Place the fabric in a hoop — this is optional, but it helps keep your tension even, especially when you’re still getting comfortable with the stitches.
Using two strands of brown floss, embroider the handle in three close rows of chain stitch.

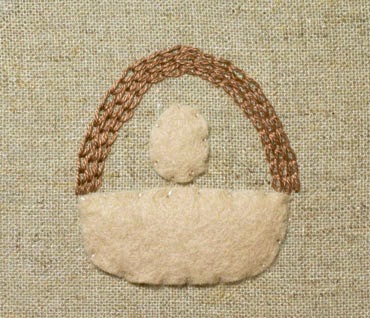
Pad the Basket and Head
This is where the “stump” in stumpwork begins. Layers of felt create the raised shape that your stitching will cover later. It’s wonderfully satisfying to watch the design start to lift off the fabric.
Building Up the Padding
Cut out the two smallest basket shapes from fawn felt.
Place the smallest in the centre of the basket area and hold it in place with a few tiny stitches around the edge. Lay the next piece over the top and attach in the same way. The top of the felt should just cover the bottom of your handle stitching.
Do the same with the two smallest head shapes, positioning them just above the basket top.
Finally, tack a piece of interfacing to the back of your work. This gives extra support and will hide any wire ends later on.
Stitch the Bunny’s Ears
Here’s where stumpwork gets exciting — you’re making freestanding pieces that will be attached to the main design. The ears are worked on a separate piece of fabric, then cut out and wired so they stand up on their own.
Filling the Ears
Trace the ears and the largest basket shape onto your calico or muslin.
Stitch a row of backstitch around the outside edge of each ear. Starting in the centre, fill the inner ear with long and short stitch using one strand of peach floss.
Then work outwards to the edges with white long and short stitch.
Don’t worry about keeping your stitches perfectly even — they’re meant to represent fur, and a little unevenness actually makes them look more realistic.

Wiring and Cutting Out
This is one of the key stumpwork skills you’ll pick up in this project — wiring an edge to create a freestanding shape.
Lay a length of wire around the outside of each ear shape. Work over it with buttonhole stitches using two strands of white floss, keeping the looped edge to the outside.
Cut closely around the ears, but leave the wire ends protruding from the base — you’ll use these to attach the ears later.

Attach the Ears
Securing the Freestanding Pieces
Use a stiletto to poke two small holes at the top of the head on each side. Pass the wire ends from each ear through the fabric and interfacing.
On the back, hold the wires in place with overcasting stitches. Bend the wires at different angles to help secure them — the interfacing prevents the wire ends from being visible on the front.
Attach the largest white felt head shape over the previous padding, covering the raw edges where the ears meet the fabric.

Embroider the Head and Grass
Covering the Padding
Now you cover all that felt padding with stitching. Using one strand of white floss, embroider the head in long and short stitch.
Here’s a tip that makes a real difference: scoop your needle through the felt only, rather than going through all the layers. This keeps the padding nice and plump instead of squashing it flat.
Take your stitches over the edge onto the backing fabric so that no felt peeks through. At the top of the head, stitch through the base of the ears to further secure them and hide any remaining raw edges.

Adding the Grass
Using one strand each of two different greens, work two rows of velvet stitch to represent grass poking out of the basket top.
Work the grass to each side of the bunny’s head only — not in front of it.
Once the loops are formed, cut them open and trim to different lengths for a natural look. In the photo you can see the left side already cut, while the right still has uncut loops.

Embroider the Basket Slip
Now you’re making a slip — a separately stitched piece that gets applied to the main design. This basket is worked on calico, then cut out and attached to create that lovely raised effect.
Couching the Basketweave
Stitch the third (largest) basket shape using two strands of brown thread in Bokhara couching. Try to stagger the couching stitches to create a basketweave effect.
Once the stitching is complete, cut around the basket about a quarter inch from the stitched edge. Turn the unstitched edge over to the wrong side and, gathering slightly, tack it to the back.


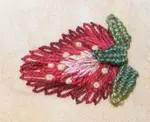
The completed basket slip, ready to attach
Attach the Basket and Paws
Building the Scene
Stitch the basket slip to your background around the sides and bottom, but leave the top edge free — you want bunny to look like he’s actually sitting inside the basket, not behind it.
If you like, slip a little toy filling behind the basket before you close it up. This gives it even more depth and dimension.
The paws are worked in the same way as the ears (long and short stitch, wired edges), but in all white — no peach centre.
Poke the wire ends through just below the top edge of the basket and stitch in place on the back. Then fold the paws down over the basket rim, making sure the right side faces outward.
Now add the features — tiny French knots or straight stitches for the eyes, nose, and mouth. He looks much happier with a face!

Add Needlewoven Leaves and Flowers
The finished bunny with needlewoven leaves and cast-on stitch flowers
To finish the design, work some needlewoven picots below the basket to represent leaves.
A tatting thread (Fil à Dentelles, size 80) works beautifully for these — it’s fine enough to get plenty of weaving into a small space, which gives the leaves a lovely dense texture.
You may want to anchor the tips of some leaves with a tiny stitch so they lie where you want them. They do tend to have a mind of their own!
Add some flowers if you like — I made mine with cast-on stitch, but bullion knots or tiny lazy daisy flowers would work beautifully too.
Ways to Display Your Bunny
- Aperture card: Mount in a card blank with an oval or rectangular opening — a lovely handmade Easter card
- Small frame: A 4×6 inch frame shows him off beautifully
- Slow stitching piece: Add him to a larger slow stitching project as a focal point
- Stitch him again: Now that you know the techniques, try changing the colours or adding more flowers
Ready for Your Next Project?
Now that you’ve got the basics of stumpwork under your belt, here are some places to go next.
Stumpwork Techniques Guide
Go deeper into padding, raised stitches, slips, and wired shapes with this complete overview of stumpwork methods.
Explore techniques →Needle Lace Heart Tutorial
Another beautiful 3D technique. Learn corded Brussels stitch and double Brussels stitch in this free tutorial.
Try needle lace →Woven Picots
Master the needleweaving technique used for the leaves in this tutorial — they make gorgeous realistic petals too.
Learn picots →Embroidery Stitch Index
Browse all the stitches used in this tutorial and many more — with step-by-step instructions for each one.
Browse stitches →You might like these
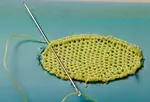
Woven picots: How to Embroider Realistic Petals and Leaves
Learn how to create stunning woven picots with this step-by-step guide! Perfect for adding texture and dimension to your embroidery projects
Stumpwork Embroidery: A Brief History of this Intricate Craft
Learn Stumpwork Embroidery techniques including padding with felt, raised embroidery stitches, adding slips and creating wired needlework petals
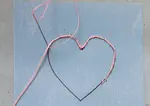
A Detailed Tutorial for Making a Pretty Needle Lace Heart
Learn to create a beautiful needle lace heart with this step-by-step tutorial for beginners. Master corded single Brussels stitch and double Brussels stitch
Stay connected between projects
If you’d like occasional updates from my embroidery room, including new patterns, gentle tips, and little things I think you might enjoy, you’re warmly invited to join the Stitchin’ Times newsletter.
About Me - Contact Carol - Privacy Policy - Site Map - Testimonials
Please do not copy the content of this site. It is protected by Copyscape.
Copyright © 2006- www.needlework-tips-and-techniques.com All rights reserved