A Needle Lace Heart Tutorial for Beginners
In this tutorial, you will learn how to create a needle lace heart using the corded single Brussels stitch and the double Brussels stitch. Your finished lace could be appliquéd onto a crazy quilt block and further embellished with hand embroidery.
Needle lace is a popular choice for stumpwork designs, particularly when it comes to creating clothing for human figures, because of its intricate texture and delicate appearance.
This simple project also introduces the basic technique of couching the outline of your shape (known as a cordonet).
What will you need?
To begin, you'll need a few essential materials.
For this demonstration I used Fil a Dentelles from DMC, which is a size 80 thread often used for tatting. As you gain more experience, you can experiment with finer threads to create even more delicate lace.
In addition to your lace thread, you'll need a normal sewing thread in a similar colour to your tatting thread for tacking your outline in place.
You will also need 2 needles - a short pointed needle and either a ballpoint or small tapestry needle, which are both blunt.
The Needle Lace Pad
Before you start the stitching process, it's essential to create a stable foundation for your lace.
A needlelace pad provides a firm base, allowing you to work intricate stitches without distorting the fabric.
To create your pad, fold a long rectangle of firm fabric (such as calico or muslin) into three layers. Place your paper pattern on top of the folded fabric and secure it with clear or blue sticky-backed plastic. This prevents accidental piercing of the paper and allows your needle to slide smoothly across the surface.
Couching the cordonet

Cut a length of thread for the outline of your lace. Folded in half, this needs to be long enough to go around the entire shape.
Thread your sharp needle with sewing thread and tie a knot in the end. This temporary thread will not be part of your finished lace.
Start working halfway down one side of the heart by laying the doubled thread on the outline.
Bring your needle to the right side on the outline and take it to the back inside the loop of folded thread to secure it (Fig. 2).
Stitch the cordonet in place, coming up on the outline, over the folded thread, and back down in the same hole. Keep these stitches close together (about 1/4 inch apart) to form a firm foundation for your needle lace.
 Fig. 2 - Joining the cordonet
Work round to the point at the bottom of your heart in this way. Then thread your ballpoint or tapestry needle with one end of the outline thread.
Slip the needle through the loop where the thread was folded at the start. This ensures that your lace won't fall apart when you are finished.

Lay the single strand back beside itself towards the bottom of the heart, forming a double outline as for the rest of the shape.
Continue to use your sharp needle and sewing cotton to couch the doubled thread in place.
Fasten off your sewing cotton on the back of the fabric pad when the outline is completed.
Don't cut off the outlining thread ends at this point. We can use them later for buttonholing over the outline.
The Corded Single Brussels Stitch
From here on, your stitches will not go through the fabric pad at all. They will lay on the surface, winding through and under each other to form the lace.
The corded single Brussels stitch is an excellent starting point for beginners because it provides a solid foundation for more complex needle lace techniques. This stitch allows you to create beautiful, intricate designs and is a great way to build confidence in your stitching abilities.
To begin, thread a length of tatting thread into your ballpoint needle. Secure this thread to the left side of your heart by winding it through the outline a couple of times.
Next, slip your needle under the outline further up the heart, forming a long straight "cord" parallel to the side of the heart (Fig. 4).
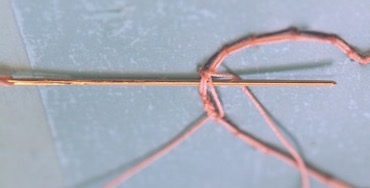 Fig 4 - Starting the corded brussels stitch
Take your needle under the doubled outline, under the cord, and over the working thread (Fig. 5). Continue working stitches in this way until you reach the outline.
 Fig 5 - Completing the first row
Take the needle between the double outline threads to the outside of the heart, then slip it under both strands with the point towards the inside of the heart.
Throw another cord across the shape and slip the needle between the outline threads again.
Take the needle under the outline and over the working thread to create the first buttonhole stitch in your second row (Fig 6).
By doing this you are increasing the number of stitches, and therefore the length of the row, as your shape gets wider. You will also need to do the same at the other end of this row.
 Fig 6 - starting second row
Now work your stitches by slipping the needle through the loops of the stitches in the first row, under the cord and over the working thread as shown in Fig 7.
Continue in this way, increasing as necessary until the first half of your heart is complete.
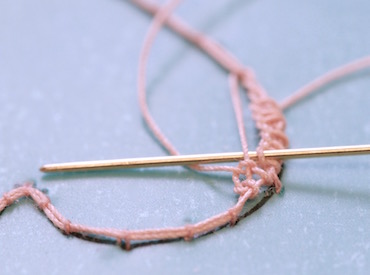 Fig 7 - Corded single brussels stitch
The Double Brussels Stitch: A New Challenge
For the second half of our heart, we'll work double Brussels stitch without using a cord as guidance.
This stitch creates a more open texture than corded single Brussels stitch and requires slightly different tension control (Fig. 8). By learning both stitches, you'll be able to create a stunning contrast in your lace design.
This time we will work into two of the previous stitches, then miss two loops. This is continued across the whole row.
Fig 8 shows the first row of double brussels completed on the right hand side of the heart.
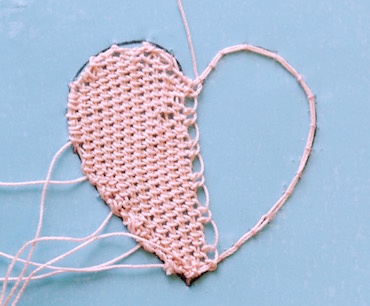 Fig 8 - Double brussels stitch
As before slip your needle through the doubled outline and then work in the other direction, putting two buttonhole stitches into the gap in the previous row, and then missing two loops.
This will create a more open texture than the corded stitch we used for the first half of our heart.
Continue to work rows until the entire heart is full.
Catch your last row under the outline on the right hand side as you stitch.
 Fig 9 - Double brussels stitch continued
Buttonhole stitch the edge of your heart
To finish off your lace heart, work close buttonhole stitches over the cordonet with your corded edge facing outward (Fig. 10).
Catch any loose ends of thread as you go.
 Fig 10 - Buttonholing the edge
Releasing your needle lace from the pad
When your needle lace heart is complete, turn over your pad and snip away any remaining couching stitches holding it in place.
Gently lift off your lace from its pad using small tweezers.
Use small tweezers to carefully remove the sewing cotton ends from your lace.
With these steps and explanations, you'll be well on your way to creating a beautiful needle lace heart that showcases your skills and creativity.
I hope you have enjoyed learning the basics. You might want to try out my 3D spring daffodil next, or learn about the history of the craft.
What did you think of this page?
Did it give you all you needed or did anything else spring to mind? If there was something missing give me a shout – or let me know if this page proved helpful (do let me know which page you are commenting on).
Would you like a direct reply? Just pop your email address below, and I'll be in touch.
Stay connected between projects
If you’d like occasional updates from my embroidery room, including new patterns, gentle tips, and little things I think you might enjoy, you’re warmly invited to join the Stitchin’ Times newsletter.
No pressure. Just a friendly note now and then to keep you inspired.
You Might Like These
Stumpwork Embroidery: A Brief History of this Intricate Craft
Learn Stumpwork Embroidery techniques including padding with felt, raised embroidery stitches, adding slips and creating wired needlework petals
Woven picots: How to Embroider Realistic Petals and Leaves
Learn how to create stunning woven picots with this step-by-step guide! Perfect for adding texture and dimension to your embroidery projects
Easy Elegance - Craft a Needlelace Daffodil with These Simple Steps
Embroider your way to spring with this detailed needlelace daffodil tutorial - perfect for beginners and beyond!


Copyright © Carol Leather - 2006-2024
About Me - Contact Carol - Privacy Policy - Site Map - Testimonials
Please do not copy the content of this site. It is protected by Copyscape.
Copyright © 2006- www.needlework-tips-and-techniques.com All rights reserved