- Home
- Needlepoint
- How to Needlepoint
NEEDLEPOINT TUTORIAL
How to Needlepoint — Velvet Stitch
Create beautifully realistic fur, fluff, and pile textures with this versatile looped stitch
When Your Design Needs a Furry Texture
Joyce, like many of my readers, was learning how to needlepoint. She reached out to me for advice on a specific design she was stitching.
Specifically, she wanted to know how to create a furry texture for the cat in her project.
I suggested the velvet stitch technique, which I'll explain in this guide. This stitch is ideal for creating the appearance of fur or fluff — think bunny tails, the bodies of butterflies or bees, or even a horse's mane.
You can use this versatile stitch on other fabrics too, however, canvas has the benefit of ensuring you space your stitches evenly. This means you won't have areas of dense plush alongside patches where it appears your stitching has mange! Not the best effect if you are trying to portray a furry creature. It may give the intended result if you are stitching something more random, such as a tree or bush.
In learning how to needlepoint, using techniques like the velvet stitch can add wonderful contrast to a design which has less texture elsewhere.
Let me show you how it's done.
What Is the Best Fibre to Use for Velvet Stitch?
To emphasise the fluffy nature of trimmed velvet stitch, I like to use wool, such as Appleton's crewel wool. You want to choose something with body to it, so the stitches stand upright when grouped together, rather than flopping over and laying on the surface fabric.
I find tapestry wool will work at a pinch if you separate the strands after you cut them. However, it is thicker and harder to pull through the canvas.
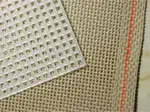
Canvas
An 18 count needlepoint canvas is ideal. The threads are close enough to give a dense "fur" effect, while still allowing the wool to pull through gently.
Needle & Thread
I suggest a size 18 tapestry needle for 2 to 3 strands of crewel wool.
How to Needlepoint: Making Your First Velvet Stitch
Begin with the bottom row of your velvet stitch section and work towards the top.
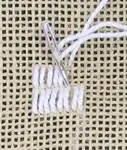
Step 1: The half cross stitch
Start by working a half cross stitch from A to B. Then bring the needle back up in the first hole again. Holding the yarn under your thumb, take the needle back through the canvas at B, but don't pull the yarn right through.
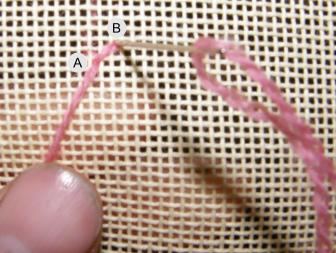
Step 1 — Work a half cross stitch from A to B
Step 2: Leave a loop
Leave a loop on the surface and bring the needle back up at C. Do not put your needle through the loop!
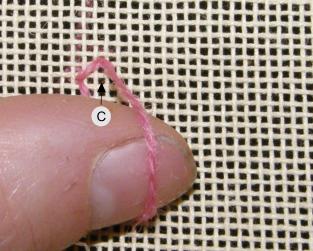
Step 2 — Leave a loop and bring the needle up at C
Step 3: Complete the stitch
Take the needle back down at D, holding the loop under your thumb to keep it in place, to complete the velvet stitch.
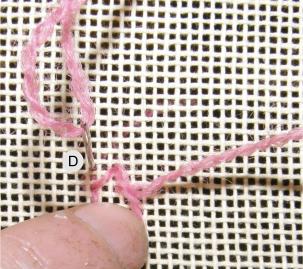
Step 3 — Take the needle down at D to complete the stitch
Building Row by Row
Step 4: Begin the next stitch
With the first stitch completed, bring the needle back up in hole C to begin the next one. Repeat the first stitch along the rest of the row.
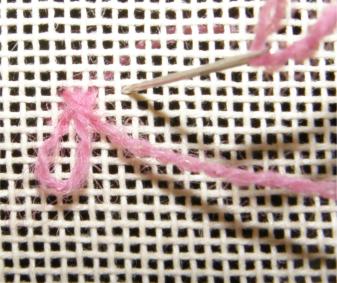
Step 4 — Bring the needle up at C to begin the next stitch
Step 5: Work additional rows
Work following rows above the first. I like to take the yarn through the back of the stitches and begin the next row at the left again. Remember to work up towards the top of your velvet stitched area.
Step 5 — Work additional rows above the first, always moving upwards
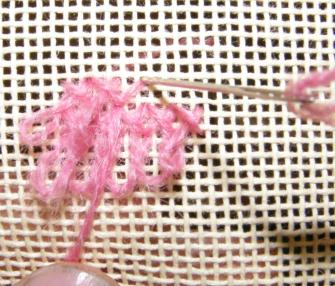
Colour Blending and Finishing
Step 6: Combine different colours
I worked the sample in the previous photos with one strand of Appleton's crewel wool for clarity, however, if you are stitching fur it can give a more realistic effect if you combine different coloured yarns in the needle. This also gives the needlepoint stitches more body.
Step 6 — Combining different coloured yarns for a natural effect
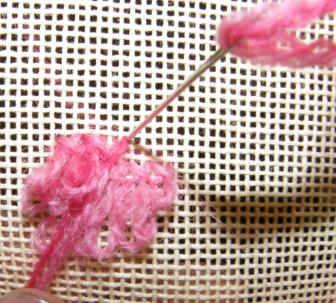
Step 7: The completed section
Here is my completed mini section of velvet stitch before trimming.
Step 7 — The completed section with loops intact
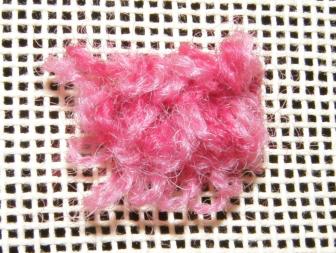
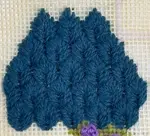
Step 8: Snip and trim
The last step is to snip the loops to create a fuzzy pile. If some loops were slightly longer than the others, you can give your fur a "hair cut" and trim it so that everything is even.
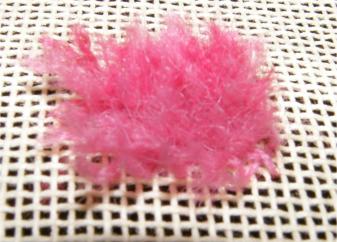
Step 8 — Snip the loops and trim for a beautifully even pile
Velvet Stitch on Fabric
I had a scrap of Hardanger fabric (22 count) left over so I used it to stitch a sample to show that it can work on any fabric.
I used 2 strands of DMC Medici wool in tones of grey. The first two rows used 2 strands of dark grey. The next two had 1 dark strand and 1 lighter one. Then in the last two rows I used 2 strands of light only.
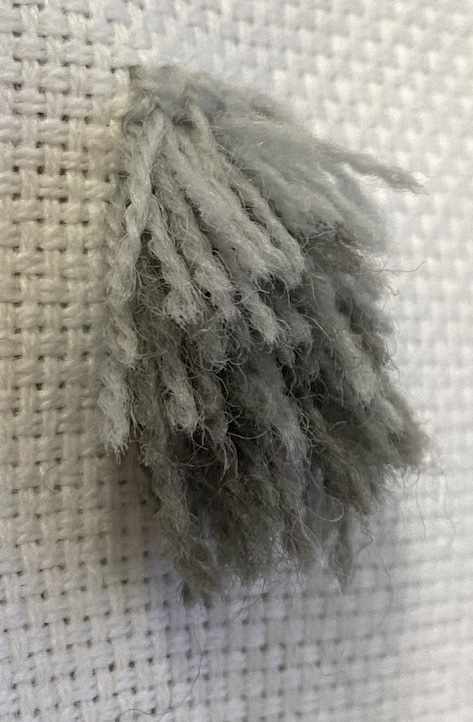
Velvet stitch on Hardanger fabric — a lovely shaded effect in grey
I photographed this sample after cutting the loops but before trimming the work so you can see the effect. This might make a nice horse's mane or tail.
Time to Create Some Texture
Whether it's a fluffy cat, a woolly sheep, or a textured rug — velvet stitch brings your needlepoint to life in a way flat stitches simply can't.
Grab some crewel wool, an 18 count canvas, and give it a try. Start with a small practice piece — once you feel the rhythm of loop, cross, loop, cross, you'll be hooked. And don't forget to experiment with blending different coloured strands for truly realistic fur.
You might like these
Needlepoint Tent Stitch: Basketweave, Continental & Half Cross
Learn how to do tent stitch in three variations: half cross, continental, and basketweave. Step-by-step guide with images to perfect your needlepoint technique.
Needlepoint Patterns: Discover Beautiful Designs for Your Next Project
Needlepoint patterns that use textured needlepoint stitches and over-dyed threads make up the Textures to Dye for range
Gobelin Stitch: Slanted, Encroaching & Interlocking Variations
Learn 7 Gobelin stitch variations for needlepoint: slanted, encroaching (interlocking), Hungarian, Parisian and more. Step-by-step instructions + tips.


Stay connected between projects
If you’d like occasional updates from my embroidery room, including new patterns, gentle tips, and little things I think you might enjoy, you’re warmly invited to join the Stitchin’ Times newsletter.
About Me - Contact Carol - Privacy Policy - Site Map - Testimonials
Please do not copy the content of this site. It is protected by Copyscape.
Copyright © 2006- www.needlework-tips-and-techniques.com All rights reserved