How to do blanket stitch
Versatile and decorative, the blanket stitch has a rich history, but is still popular today in both freestyle and counted embroidery techniques.
Its beauty lies in its ability to be used in a variety of ways. You can create neat edges or add creative flair to your work by placing the stitches wherever you like.
Look at the following three photos, each of which uses the stitch in a different way.

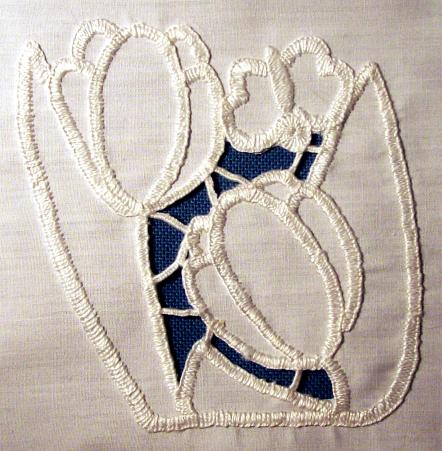
I used it to outline and shade flowers and leaves, build a freehand hermit crab shell and to form bridges that hold sections of a cutwork tulip design together (and form the shapes of the flowers). The possibilities are endless, and that's what makes hand embroidery so exciting!
Another application is in needlelace, where no fabric is required.
The blanket stitch is perfect for this purpose because it creates a strong and durable edge that can withstand the tension of the lace. Additionally, the stitch can be used to create decorative elements within the lace, such as loops or picots.
What will you find on this page?
I'll guide you through the steps to work this simple yet effective stitch. We will compare working in the hand to using an embroidery hoop, as in the video.
Go straight to the video further down the page.
I’ll also provide tips on thread selection, how to create neat corners and join in a new piece of thread seamlessly. And if you're feeling adventurous, I'll even introduce you to some fun variations.
Blanket stitch tutorial
You have the option to use an embroidery hoop or work without one. I will provide guidance for both techniques. Although working in your hand may be faster, be cautious not to pull the thread too tightly as it may cause the fabric to bunch up.
What is the best thread for blanket stitch?
As a hand embroiderer, one of the most important decisions you'll make is selecting the right thread for your project.
It's not just about color - the type of thread you choose can make a big difference in the final result.

Keeping your stitches even while you learn
A trick when learning this stitch is to mark evenly spaced dots on your fabric with either a pencil or a disappearing ink pen (as I have demonstrated in the photos below).
Alternatively, you could use a fabric with printed stripes or checks to guide you. With a bit of practice you should find you no longer need these guides and can stitch evenly without them.
Hoop or not?
The first demo shows the process when working without a hoop, or in the hand.
Whether you prefer the stability of a hoop or the freedom of working in your hand, there are benefits to both techniques. If you choose to work without a hoop, be mindful not to pull the thread too tightly as it can cause the fabric to bunch up.
How do I start a blanket stitch?
We’ll start by making an away waste knot.
This simple technique involves tying a knot in your thread and then securing it off to one side of your work where you won’t stitch over it. The knot will be cut off later and woven into the back of your work, leaving you with a neat result.
It's a small detail, but it can make a big difference in the overall look of your embroidery.
Bring your needle to the front side, where you wish to start stitching. I labeled this point A in the photo.
Pass the needle back down at the first dot on the top row (B), but don't pull the thread all the way through.
Bring the needle point back up at the next dot along the bottom row (C) tuck the thread under the point and then pull the needle through the fabric, keeping an even tension, until the vertical part of the stitch lays comfortably on the surface.
As you move along the row, you can pick up a "scoop" of fabric under the needle by inserting it at D and bringing it up at E, ensuring the thread from the previous stitch is under the point of the needle, and then gently pull the needle through.
Repeat the same process until the end of the row. This is known as the sewing method.
The next photo shows the finished row of blanket stitch.
As you can see, it's tricky to get the an even tension when working in this method.
If you pull too tight, then a ridge can form. So let's look at a way to avoid these issues.
Stitching in a hoop

Not only does a hoop make it easier to keep the tension even, but if you can secure your hoop in a stand, you'll have both hands free to manipulate the needle and thread.
When working in a hoop, I find that using the stab stitch method is the way to go. Since the fabric is stretched firmly, it won't be possible to push the needle through and bring it back out again in one movement. But don't worry, with a little practice, you'll get the hang of it!
Bring your needle up at your starting position.
Take it back down at the top of your row, but don't pull the thread all the way through. Instead, leave a big loose loop of thread on the right side of your work.
Bring your needle back to the front inside this loop, on the next dot in the bottom row.
Pull the thread through the fabric without pulling it too tight.
Continue in this manner until the end of your row.
Fasten off by just making a small "tie down" outside of the last loop.
The last photo shows the resulting row of stitches, which has better tension throughout.
I used Perle cotton number 8 for this sample. The pen marks will disappear within 24 hours.
How far apart should blanket stitch be?
In this example, I've spread out the spacing to mimic a blanket edge. However, if you take a look at the flowers at the top of the page, you'll notice a tighter arrangement. This goes to illustrate that there are no hard and fast rules.
How do you work around a corner or curve?
The diagram below demonstrates how to create an edging on evenweave fabric.
Turning an outside corner
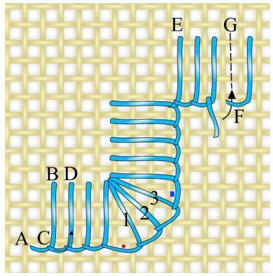
To make a turn, leave one hole open (shown in red on the illustration) and work three diagonal stitches.
Skip the next hole (marked in blue) and continue until you reach the next turning point.
You'll use the corner hole five times, so be cautious not to tug it too tightly since this will cause a large and unsightly hole.
Turning an inside corner
Take the needle down at E to work around an inside corner (diagram above). Bring it back up over the thread to make a loop at the corner point.
Working around a curve
The diagram above illustrates how to navigate sharp corners while stitching on evenly woven fabric. But what if you're working with a fabric that doesn't have a clear grid pattern?
No worries, you can create your own guides using tailor's chalk or a water-soluble marker. This will help keep your stitches on track when dealing with curves.
For the best results, try to maintain consistent stitch spacing along the outer, looped edge. However, you'll need to adjust your stitching on the inner edge based on the curve's tightness.
- For sharper curves, place your stitches closer together on the inner edge.
- With gentler curves, you can allow for a bit more space between them.
You can also mark a line to follow with masking tape or acid-free artist's tape, then pencil in regular dots to aid with stitch spacing.
Changing threads in blanket stitch
If you need to switch threads in the middle of your work, don't worry!
An easy solution is to set aside the old thread and secure the new one by weaving it through the back of the existing embroidery. Next, bring the new thread through a hole to the right of the last point (at point F on the diagram above) and continue sewing.
To finish joining, slip the old thread through the first loop made after switching threads. Then, take your needle down through the fabric at G to fill in the missing section. Finally, fasten off at the back of your work.
How do you make a decorative blanket stitch?
Whipped blanket stitch
You can fancy up your stitches by whipping the corded bottom edge with another thread.
You will get a different effect depending on the combination of threads used.
Here I used the same type of thread for the whipping - perle number 8 - while choosing a different colour.
As you take the needle only under the previous work and not through the fabric, thread up a blunt needle to avoid accidentally piercing the fabric.
Back to back or barb stitch
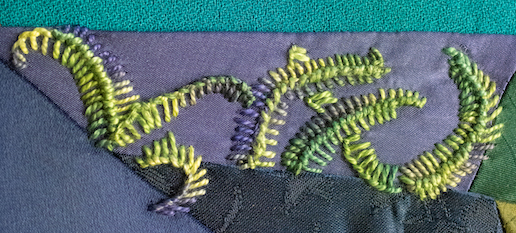
The ferns in this photo have been stitched using hand-dyed Pearl cotton and a technique called barb stitch.
This method involves placing two rows of blanket stitch back-to-back and then whipping the looped edges together down the center.
It produces a remarkably realistic appearance and would look lovely in autumnal golds and browns.
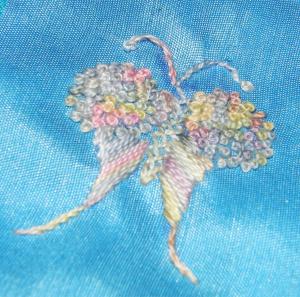
How do you make a buttonhole wheel?
You can create a scalloped effect by varying the length of your blanket stitches.
Experiment with increasing and decreasing the length over a series to form "hills" and "valleys". Additionally, you can form circles by always taking the needle down at the central point.
Have fun incorporating these ideas into your hand embroidery projects.
You might like these
Learn two variations of Fishbone Stitch - flat and raised
Learn 2 types of Fishbone stitch to add to your range of basic embroidery stitches
Padded Satin Stitch Initial
Satin stitch tutorial showing a padded initial being embroidered
Stitch a French knot the easy way with this step by step tutorial
The best way to stitch a French knot without getting in a tangle. These clear instructions and video will show you how its done


Copyright © Carol Leather - 2006-2024
About Me - Contact Carol - Privacy Policy - Site Map - Testimonials
Please do not copy the content of this site. It is protected by Copyscape.