- Home
- Needlepoint
- Bargello
BARGELLO NEEDLEPOINT · BEGINNER GUIDE
Bargello Needlepoint for Beginners
Bold geometric patterns, vibrant colours, and a relaxing stitch rhythm
If you're just starting out with hand embroidery and looking to explore a fun and visually striking technique, Bargello needlepoint is a fantastic choice!
With its bold geometric patterns and vibrant colours, it can add a unique flair to your projects while still being beginner-friendly.
Plus, it's a repetitive stitch technique, which makes it both relaxing and meditative—perfect if you want to improve your stitching skills without feeling overwhelmed.

If the word Bargello is unfamiliar, you may have seen this form of work referred to as Florentine stitch, Hungarian point or flame stitch embroidery.
It is not a new needlework technique. In fact, embroiderers used it in the 15th century for bed and wall hangings, upholstered furniture and table coverings.
But you don't need to undertake such huge projects as those! It works just as well on pillows, bags, belts, purses or even framed pictures.
I was first introduced to it as a teenager in the 1970s, when we used wild and wacky colour combinations!
What You'll Need
There are some essentials you will need, and some "nice to haves" if you are thinking of trying this embroidery technique...
What is Bargello Needlepoint?
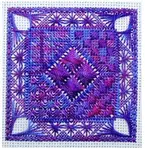
To create this form of needlework you build up distinctive patterns from rows of straight stitches, arranged in a zigzag line, and repeated in varying shades or colours.

The steepness of the zigzag depends on how many threads the stitch is worked over, and the position of subsequent stitches.
To give a more rounded effect, groups of stitches (positioned along the same horizontal row of holes) can be worked either at the end or part way down a slope.
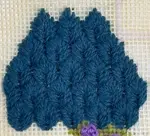
Traditionally all the stitches in a design are the same length throughout. They can also be arranged to form a lattice work, as in the photo above.
Starting Your First Bargello Pattern
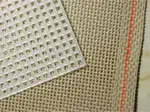
Prepare Your Canvas
Start by cutting your canvas to size, leaving at least an extra inch around the edges to allow for framing or finishing. You may want to secure the edges with masking tape or overlock stitching to prevent fraying as you work.
Choose Your Pattern
For beginners, it's best to start with a simple zigzag or diamond pattern. Find a pattern that appeals to you and draw light guidelines on your canvas if it helps. More about the types of pattern below.
Thread Your Needle
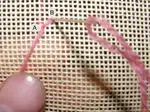
Cut a manageable length of thread (around 18 inches) to avoid tangling. Thread your tapestry needle, leaving a tail of a few inches. You don't need to knot the end of your thread; simply weave it under a few canvas threads on the back of your work to secure it. I have a page all about threading needles here.
Start Stitching
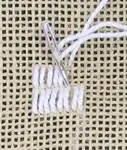
Bargello stitches are worked in long, straight lines that are vertically aligned on the canvas, typically over 2 to 4 canvas threads. Start from the back of the canvas and bring your needle up through the first hole. Move up or down a few threads as indicated by your pattern, and push the needle back down. Continue this way, keeping stitches neat and evenly spaced, following the pattern's colour changes to create the iconic Bargello effect.
Change Colours
One of the most exciting aspects of Bargello is the colour transitions. When it's time to switch colours, simply weave the old thread under the stitches on the back of the canvas and start with the new colour in the same way. This helps keep your work tidy and secure.
Finish Off Your Project
Once your pattern is complete, secure the last thread by weaving it under a few stitches on the back. Trim any excess thread, and your project is ready for framing or turning into a cushion, bag, or wall hanging.
Design in Bargello

The diagram shows how stepping by more canvas threads creates a higher peak
There are three main types of design in this type of needlepoint: row, motif or mitered.
Row Design — The simplest type. Establish the pattern in the first row, then repeat using a different colour, tone or tint in subsequent rows.
Motif Design — Part of a row is mirrored to form a medallion or motif. It can be filled in repeating rows or each enclosed area can be treated differently. The pattern is mainly formed by the use of colour.
Mitered Design — A triangular section mirrored horizontally and vertically. Dorothy Kaestner introduced this method in the late 1970s, producing motifs now known as tulip, rose and pineapple.
How to Use Colour
In Bargello the pattern relies heavily on hue changes. These can be subtle or vibrant.

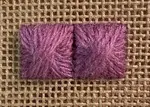
A monochromatic scheme using tints of red (pink) and shades (burgundy)
Monochromatic
Uses shades (mixed with black) and tints (mixed with white) of one colour. In the photograph above I used tints of red (pink) and shades (burgundy) in a repeating sequence.
Analogous
Uses related hues that are close to each other on the colour wheel. For example, red, orange and yellow. Another choice would be purple, blue and green.
Complementary
Uses colours opposite each other on the colour wheel, such as yellow and purple or orange and blue. The trick is to use much less of the contrast than the dominant colour — think of it as an accent!

Hand-drawn colour wheel using Prismacolor coloured pencils
Around the edge I pressed harder to give the most vibrant colour, and the lighter colour inside represents the colour with white added, or a paler tint of the original hue.
The darker inner wheel shows where I used the complementary colour to "grey" the pure colour, by mixing the two together (or in this case layering one over the other).
Why You'll Love Bargello
Bargello needlepoint is both easy and satisfying once you get into the rhythm of the repeating stitches.
It's a relaxing technique that produces eye-catching, professional-looking results, even for beginners. Plus, the more you practice, the more intricate and colourful your designs can become!
So grab your canvas and threads, and dive into the wonderful world of Bargello needlepoint!
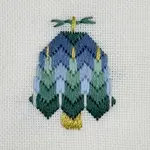
Ready to Try Bargello?

Have a go at my free Bargello bell design — it's perfect for beginners and would make an ideal Christmas card!
Get the Free Pattern →Free download — start stitching today
You might like these
Needlepoint Patterns: Discover Beautiful Designs for Your Next Project
Needlepoint patterns that use textured needlepoint stitches and over-dyed threads make up the Textures to Dye for range
Needlepoint fibers and the effect they can give
Showing the effect different needlepoint fibers can make to a design. Photographs of my students work help to illustrate this
Needlepoint Stitches: Choose the Right One for Stunning Designs
Struggling to choose the right needlepoint stitch? Get expert tips on selecting stitches for texture, direction, and style. Learn effortlessly


Stay connected between projects
If you’d like occasional updates from my embroidery room, including new patterns, gentle tips, and little things I think you might enjoy, you’re warmly invited to join the Stitchin’ Times newsletter.
About Me - Contact Carol - Privacy Policy - Site Map - Testimonials
Please do not copy the content of this site. It is protected by Copyscape.
Copyright © 2006- www.needlework-tips-and-techniques.com All rights reserved