- Home
- Needlepoint Stitches
- Scotch Stitch
Scotch Stitch
You might know Scotch stitch as Cushion, Chequer or Scottish. The names relate to the same needlepoint stitch, and are used interchangeably.
To be more accurate this is a stitch formation, as it consists of individual stitches arranged in a certain way to give the effect of a square area on the canvas.
It is super easy to work, as shown by the diagram and instructions below.

To give the best effect, choose a needlepoint yarn that comfortably fills the holes, without leaving any bare canvas showing. Tapestry wool would work for example on a 10 or 12 count canvas, whereas a finer yarn would work best on an 18 count base.
How to work the basic Scotch stitch square
Bring the needle up from the back at the point marked 1 on the diagram above. Take it down again in the next available diagonal hole to create a short straight stitch.
Next, bring it back to the surface one hole down from your starting point, at 3 on the diagram. The needle will go back through the canvas in the hole horizontally across from point 2.
Work two more stitches in the same way, with each one getting longer. This brings you to point 8 on the diagram.
Now we start to reduce the length of each stitch so as to form a square when finished. Point 14 marks the end of the first square of Scotch Stitch.
The diagram shows 4 holes being used on each side of the square, but you can also reduce this to 3 to fill a smaller area of the canvas, if required.
Alternating Scotch Stitch

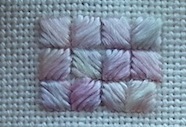
Although the combination of stitches is worked in the same manner, the direction of each alternate block can vary, giving the effect shown in the photograph above, which is commonly known as Alternating Scotch Stitch.
As I was stitching an area to represent paving slabs for this project, I used multiple strands of different colored fine crewel wool in the needle at the same time, for some of the squares.
The effect of having the stitches in each square go in alternate directions is highlighted if you use a shiny or lustrous fiber. The pinky sample was stitched in a variegated rayon on an evenweave fabric.
Other variations
By stitching each alternate grouping in a different color you get a checkerboard effect (which perhaps explains the Chequer Stitch name). I have used this variation in the past to represent a quilt in a needlepointed picture of a child's bedroom, but sadly did not think to take a photograph at that time.

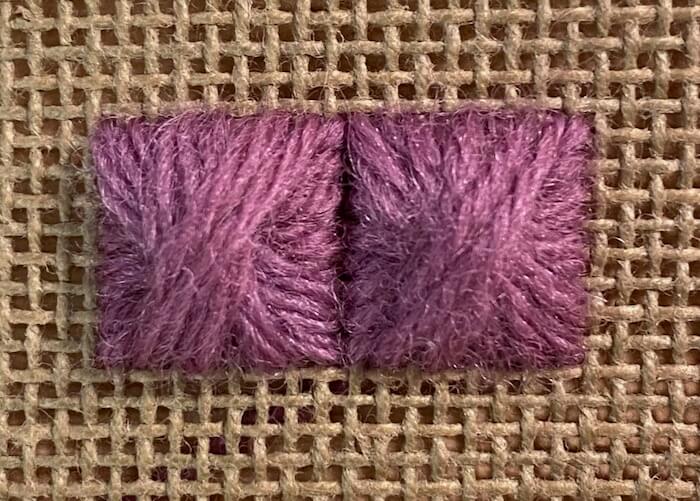
A similar effect is achieved when you work a scotch stitch block followed by one done in continental stitch, as shown in the photograph (right), which was stitched in stranded cotton floss on evenweave. You can stitch the blocks so that the long stitches all go in the same direction, as I have done or in alternate directions.

This results in a lovely textured effect, with this combination of stitches.
Surrounding each square with tent or continental stitch gives us Framed Scotch Stitch, as shown in the photograph, left.
I hope you will try this needlepoint stitch in one of your projects.
You might like these
Rice stitch - an easy needlepoint stitch to learn
Try Rice Stitch - one of the simple needlepoint stitches that you can use to give many different effects
Rhodes stitch instructions and variations
Learn how to stitch rhodes stitch and its variations. Photos and diagrams show how its done and what it looks like in various threads
Needlepoint: An introduction to the traditional craft
Explore the timeless art of needlepoint with our beginner's guide. From materials to techniques, we'll help you get started on your stitching journey.
Copyright © Carol Leather - 2006-2024
About Me - Contact Carol - Privacy Policy - Site Map - Testimonials
Please do not copy the content of this site. It is protected by Copyscape.