- Home
- Needlepoint
- Bargello
BARGELLO NEEDLEPOINT · BEGINNER GUIDE
Bargello Needlepoint for Beginners
Bold geometric patterns, vibrant colours, and a relaxing stitch rhythm
If you're exploring hand embroidery and fancy trying something a bit different, Bargello needlepoint might be just the thing. It looks intricate — those sweeping geometric patterns and gorgeous colour gradients — but here's the reassuring part: the technique itself is surprisingly straightforward.
The whole design is built from straight stitches, repeated in rows that shift up and down to create waves, flames, and diamond shapes. Once you've got the rhythm, it's genuinely relaxing — the kind of stitching you can settle into with a cup of tea and a good podcast.

If the word Bargello is unfamiliar, you may have seen this form of work called Florentine stitch, Hungarian point, or flame stitch embroidery. Whatever the name, it's the same lovely technique — and it's been around for centuries. Embroiderers in 15th-century Italy used it for bed hangings, wall tapestries, and upholstered furniture.
But you certainly don't need to tackle anything that ambitious! It works beautifully on cushions, bags, belts, purses, or framed pictures — smaller projects that let you enjoy the process without feeling overwhelmed.
I was first introduced to Bargello as a teenager in the 1970s, when we used wild and wacky colour combinations! Looking back, some of those choices were... adventurous. But that's half the fun — there's no wrong way to experiment with colour in Bargello.
What You'll Need
You won't need a huge kit to get started — a few essentials and you're ready to go. Here's what I'd recommend having to hand...
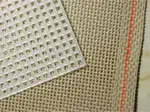
Needlepoint Canvas
A 10–14 mesh is ideal for beginners — the holes are large enough to see clearly and the stitches cover well
Canvas guide →Needlepoint Yarn
Wool, pearl cotton, or even embroidery floss all work — choose what feels right for your project
About fibres →Tapestry Needle
A blunt-tipped needle that slips through the canvas holes without snagging — much gentler on your fingers too
Needle guide →Embroidery Frame
Keeps your canvas taut while you work, which helps keep your tension even
Equipment guide →Laying Tool
Helps your thread lay flat and smooth — not essential at first, but lovely to have once you catch the Bargello bug
About laying tools →What is Bargello Needlepoint?
At its heart, Bargello is all about building up patterns from rows of straight stitches arranged in a zigzag line, then repeating those rows in different shades or colours. That's it — straight stitches, stepped up and down. No complicated stitch manoeuvres to master.

The steepness of the zigzag depends on how many threads each stitch covers, and where you position the next stitch. A big step up creates sharp peaks; a smaller step gives gentler waves.
To create a more rounded effect, groups of stitches can share the same horizontal row of holes — either at the end of a slope or partway down. This softens the zigzag into curves.

Traditionally, all the stitches in a design are the same length throughout. Once you've stitched one row, the rest follow the same path — you're simply changing colour each time. That repetition is what makes Bargello so meditative.
Starting Your First Bargello Pattern
Prepare Your Canvas
Cut your canvas to size, leaving at least an extra inch around the edges for framing or finishing. I always tape my edges with masking tape to stop them fraying — it saves frustration later. If the raw edges bother you, a quick row of overlock stitching works too.
Choose Your Pattern
A simple zigzag or diamond pattern is a lovely place to start. Don't worry about picking the "perfect" design — the beauty of Bargello is that even basic patterns look stunning once the colours build up. More about the types of pattern below.
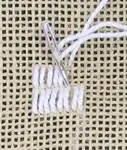
Thread Your Needle
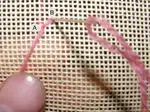
Cut a manageable length of thread — around 18 inches — to avoid tangling. You don't need to knot the end; simply weave it under a few canvas threads on the back to secure it. If you're not sure about the best way to thread a needle, I have a whole page of tips here.
Start Stitching
Bargello stitches are straight vertical lines, typically covering 4 to 6 canvas threads. Bring your needle up from the back, count the threads, and push it back down. Then step across to the next position — up or down according to your pattern. Keep your stitches neat and evenly spaced, and the iconic Bargello waves will start to appear.
Change Colours
This is where Bargello really comes alive! When it's time to switch, weave the old thread under a few stitches on the back to secure it, then start the new colour the same way. Don't worry if your colour changes feel awkward at first — after a few rows, it becomes second nature.
Finish Your Project
Once your pattern is complete, secure the last thread by weaving it under a few stitches on the back and trimming the excess. Your finished piece is ready for framing, turning into a cushion cover, or whatever takes your fancy.
Design in Bargello
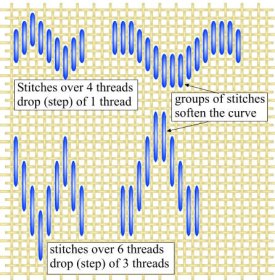
The diagram shows how stepping by more canvas threads creates a higher, steeper peak
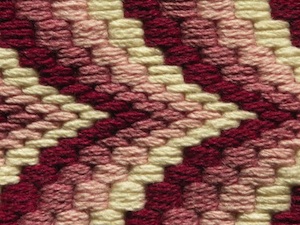
There are three main types of design in Bargello: row, motif, and mitered. Each creates a very different look from the same basic straight stitch — so once you've learned the technique, you've got three whole design families to explore.
Row Design — The simplest type, and a wonderful place to start. Stitch the first row to establish the pattern, then repeat it underneath in a different colour or shade. Each row follows the same path, so once you've got that first line right, the rest flows naturally.
Motif Design — Part of a row is mirrored to form a medallion or self-contained motif. You can fill the enclosed areas with repeating rows, or treat each section differently. The pattern emerges mainly through your colour choices, which makes this type wonderfully creative.
Mitered Design — A triangular section mirrored horizontally and vertically to create a kaleidoscope-like effect. Dorothy Kaestner introduced this method in the late 1970s, producing motifs now known as tulip, rose, and pineapple. They look complex but they're still built from simple straight stitches.
How to Use Colour
Colour is where Bargello really sings. The pattern itself creates the structure, but it's your colour choices that bring it to life. And here's the good news — you don't need to be a colour theory expert. A few simple approaches will give you beautiful results.
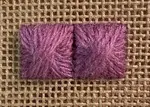
Monochromatic
Pick one colour and use lighter and darker versions of it — tints (with white added) and shades (with black added). This is a lovely low-risk starting point because everything naturally harmonises.
Analogous
Choose colours that sit next to each other on the colour wheel — like red, orange, and yellow, or purple, blue, and green. They blend beautifully and create gentle, flowing colour transitions.
Complementary
Use colours opposite each other on the wheel — like yellow and purple, or pink and blue. The trick is to use much less of the contrast colour. Think of it as a spark of accent, not an equal partner.

Hand-drawn colour wheel using Prismacolor coloured pencils
Around the outer edge I pressed harder to show the most vibrant, pure colour. The lighter colour inside represents the same hue with white added — a paler tint.
The darker inner wheel shows what happens when you mix a colour with its complement — it "greys" the pure hue, producing rich, sophisticated tones. In coloured pencil, I achieved this by layering one over the other.
Why You'll Love Bargello
Once you get into the rhythm of Bargello, it's wonderfully satisfying. The repetition is meditative, the patterns build up surprisingly quickly, and the results look far more complex than the technique actually is.
Even your very first piece will look striking — those bold colour waves and geometric patterns have a way of making everything look polished. And the more you practise, the more adventurous you can get with your designs and colour palettes.
If your early stitches aren't perfectly even, that's completely normal. Mine weren't either. Tension settles as your hands learn the rhythm, and honestly, once the whole piece is finished, those tiny variations disappear into the overall pattern.
So grab your canvas and threads, pick some colours that make you smile, and dive into the wonderful world of Bargello needlepoint!
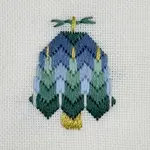
Ready to Try Bargello?

Have a go at my free Bargello bell design — it's perfect for a first project and would make a lovely Christmas card!
Get the Free Pattern →Free download — start stitching today
You might like these
Needlepoint Tent Stitch: Basketweave, Continental & Half Cross
Learn how to do tent stitch in three variations: half cross, continental, and basketweave. Step-by-step guide with images to perfect your needlepoint technique.
Needlepoint Fibers - How Thread Choice Transforms Texture
Needlepoint fibers compared — see how rayon, cotton, metallic and over-dyed threads completely transform the same design. Real workshop examples with photos.
Needlepoint Patterns: Discover Beautiful Designs for Your Next Project
Needlepoint patterns that use textured needlepoint stitches and over-dyed threads make up the Textures to Dye for range


Stay connected between projects
If you’d like occasional updates from my embroidery room, including new patterns, gentle tips, and little things I think you might enjoy, you’re warmly invited to join the Stitchin’ Times newsletter.
About Me - Contact Carol - Privacy Policy - Site Map - Testimonials
Please do not copy the content of this site. It is protected by Copyscape.
Copyright © 2006- www.needlework-tips-and-techniques.com All rights reserved