Needlelace daffodil tutorial
Craft a captivating 3D needlelace (also known as needlepoint lace) daffodil with three basic stitches in our easy-to-follow tutorial.
Perfect for beginners and seasoned crafters alike, this guide simplifies creating the daffodil's vibrant petals and unique trumpet.
Complete with clear steps and tips, you can personalize your flower with optional embellishments.
Ideal for home decor or as a heartfelt gift, this project promises a rewarding and beautiful result.
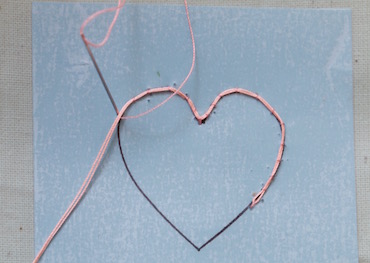
If you haven't tackled this technique before you may wish to try my simple heart tutorial first, which introduces the first two stitches. The third is explained in full on this page.
To create this needlelace daffodil, you will need:
- Tatting thread (DMC fil a dentelles) size 80 in yellow, orange, white, green
- Sewing cotton to match your tatting thread
- Sharp embroidery needle and a ballpoint or tapestry needle
- Calico (for the fabric pad)
- Paper covered florists wire (white, and green if you are working the stem)
- Matt sticky backed plastic
Creating the outer petals of the daffodil
Print out the pattern pieces here. Cut them apart leaving space around each one (don't cut on the pattern lines).
Attach each piece to a fabric pad (instructions here) with a piece of matt sticky backed plastic. We use a matt film, as a glossy one would reflect your surroundings and could be distracting.
You will need to stitch 6 petals for your daffodil. I find that I can reuse the same pattern for two or three petals before printing or tracing a new one.
Couch a doubled length of thread around the drawn shape, taking your stitches through the film, paper pattern, and all three layers of your fabric pad.
Loop one of the ends of the couched thread through the beginning loop to ensure your outline is continuous and won't come apart once you remove the lace from the pad.
The stitch used is corded single brussels (also known as detached buttonhole stitch), which is explained in detail in my basic heart tutorial.
You can choose whether to make short rows across the petals, or longer ones along their length, but keep this consistent for all petals.
 Fig 2 - Single corded brussels stitch
I find shorter rows make it less likely that I will run out of thread in the middle of a row.
When each petal is complete, work buttonhole stitches, close together, around the edge.
Turn your work over and snip the couching threads on the back. Gently release the lace from the pad, and use tweezers to remove any remaining couching stitches.
 Fig 3 - buttonhole over the cordonnet
Creating the Trumpet of the Needlelace Daffodil with Pea Stitch
The trumpet of your daffodil uses Pea Stitch, which requires two repeated rows to form the pattern.
However, you first need to create a foundation row of single brussels stitch (no cord) across one of the long sides of your rectangle, starting from the left hand side. Try to keep these stitches evenly spaced.
Take the thread around the cordonnet (outline) ready for the first pattern row of your needlelace.
Pattern row 1
Make a detached buttonhole stitch into each of the first two loops of the foundation row. Then miss two loops. Repeat till end of row. If you can't fit both of the stitches in at the end, don't worry, just work one of them.
Keep your tension loose but consistent.
You want to end up with neat stitches, a larger loop between the groups of two, and all stitches a similar size if possible.
 Fig 5 - Pea stitch row 1
Pattern row 2
Now work back in the opposite direction (left to right) making three stitches in each large loop and one stitch into each smaller loop.
Sometimes you may find the row above twists under itself sightly. In this case use your finger to "roll" it back into place so that you can clearly see the loops of the previous stitches.
 Fig 6 - Pea stitch row 2
Repeat these two rows, until your rectangle is full. Try to finish with the second row.
Whip the loops of your last row to the cordonnet at the bottom.
The photo shows that I went wrong in the center, but don't panic if this happens to you. It really won't show in your finished flower.
 Fig 7 - Completed lace for trumpet
Wiring the trumpet
Lay a length of paper covered wire on top of the cordonnet at the bottom of your rectangle. Couch it in place with sewing cotton.
 Fig 8 - Couching the wire
Work close detached buttonhole stitches over the cordonnet and wire.
 Fig 9 - Buttonhole over the wire
Release the lace from the pad and stitch the short sides of the trumpet together.
 Fig 10 - Join the side seams
Using the tatting thread, work running stitch around the other long edge of your trumpet piece. Pull tightly to gather this edge, then fasten off securely.
 Fig 11 - Gather the trumpet
Constructing the flower
You now have all the elements of your daffodil flower ready to put together.
 Fig 12 - Needlelace daffodil pieces
Using the thread you worked the petals in, attach each petal to the outside of your trumpet with small stitches. Overlap each petal a little as you work your way around the flower.
 Fig 13 - Completed flower
Daffodil stem
I felt the flower by itself was missing something, so I decided to create a stem with the papery beige sepal just below the bloom.
You can use tatting thread in a green of your choice, but I decided to use a space-dyed silk for mine.
The stem is stitched in corded single brussels taking the rows down the length of the stem, rather than across the short end.
There is no need to buttonhole over the edges as we are going to roll up our piece of lace.
 Fig 14 - Corded brussels stem
However, after taking it off the pad, you will need to couch a folded length of wire along one long edge.
Leave the loop where the wire is folded sticking out one end slightly as shown in the photograph. Trim the other ends of the wire level with your lace.
We can't couch the wire in place while the lace is on the pad, as these stitches will remain in the finished project.
 Fig 15 - Wiring the stem
Attaching the stem to your daffodil flower
Take your flower and run a gathering thread around the bottom, about 1cm from the center joining point. Pull the gathering stitches tight to create a sort of stub below the flower.
Then wrap the short end of your stem around this stub and stitch it in place, with the loop of wire peeking through the center of the flower. Take a couple of stitches through the wire loop to help secure the stem in place. This is a rather fiddly job, so take your time.
The roll the rest of the lace around the wire to form the stem, and catch stitch it in place down the length.
 Fig 16 - Attaching the stem
The Sepal
Mount the sepal pattern onto your pad, and couch the doubled outline in place. You can use a beige tatting cotton, but I chose to use a space-dyed fine cotton thread in pinky beige tones for mine.
The sepal is worked in double brussels stitch.
Buttonhole over the sides of this piece of needlelace, leaving the flat edge unstitched, before removing it from the pad.
 Fig 17 - The sepal in double brussels stitch
Attach the sepal to the stem, by wrapping it around the stem so that the tip of the sepal sits underneath the petals.
Stitch in place around the flat base and take a few stitches up the sepal to ensure it stays wrapped. Leave the rest unattached.
 Fig 18 - The completed daffodil with stem and sepal
After sitting in my needlework box for some time, my little needlelace daffodil's eventual home was on a piece of slow stitching.

What did you think of this page?
Did it give you all you needed or did anything else spring to mind? If there was something missing give me a shout – or let me know if this page proved helpful (do let me know which page you are commenting on).
Would you like a direct reply? Just pop your email address below, and I'll be in touch.
Stay connected between projects
If you’d like occasional updates from my embroidery room, including new patterns, gentle tips, and little things I think you might enjoy, you’re warmly invited to join the Stitchin’ Times newsletter.
No pressure. Just a friendly note now and then to keep you inspired.
You Might Like These
Stumpwork tutorial - bunny in a basket
This cute little bunny in a basket will help you learn the basics of stumpwork embroidery. Step by step instructions and photographs
Woven picots: How to Embroider Realistic Petals and Leaves
Learn how to create stunning woven picots with this step-by-step guide! Perfect for adding texture and dimension to your embroidery projects
Stumpwork Embroidery: A Brief History of this Intricate Craft
Learn Stumpwork Embroidery techniques including padding with felt, raised embroidery stitches, adding slips and creating wired needlework petals


Copyright © Carol Leather - 2006-2024
About Me - Contact Carol - Privacy Policy - Site Map - Testimonials
Please do not copy the content of this site. It is protected by Copyscape.
Copyright © 2006- www.needlework-tips-and-techniques.com All rights reserved