- Home
- Crazy quilting
- Crazy Quilt Block
CRAZY QUILTING TUTORIAL
How to Make a Crazy Quilt Block (Stitch-and-Flip)
Grab your fabric scraps and create something truly one-of-a-kind with this step-by-step method.

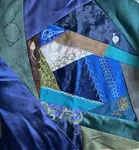
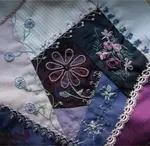
The pieced and embroidered crazy quilt block
What Sparks Your Creativity?
This isn't any ordinary quilting technique! Think outside the box and let your imagination run wild. This is your chance to break free from tradition and create something truly one-of-a-kind.
If you love history, you'll love learning about the Victorian crazy quilts that inspired this technique. But let's not get too caught up in the past—it's time to get stitching!
For me, it's often a chance discovery, like the day I stumbled upon a bundle of fabric scraps in a local craft shop.
In the bundle, I found a lovely printed cotton featuring juicy strawberries, plump raspberries, and sweet cherries. There was also a bold pink and a creamy white fabric dotted with gold.
I wanted to make a summery crazy quilt block. So, I scoured my scrap bag for matching and contrasting pieces to add to these finds.
The real magic of crazy quilting happens when you add embroidery to the seams. Stitches like the herringbone, feather stitch, and bullion knot transform flat seams into decorative lines.
You might like the calm rhythm of hand-stitching or the speed and precision of a sewing machine. Making a crazy quilt block by hand can be very satisfying, so that is the method I am using for this block. If you are new to hand stitching, our hand embroidery for beginners guide covers the basics of threading, knotting, and keeping even tension.
I chose my fabrics, laundered and ironed them, and began work.
Stitch-and-Flip: What It Is (and Why It Works)

The completed block before embroidery
Are you ready to join me?
Cutting the First Fabric Patch

First, cut a square of muslin or calico for the backing. It should be 1 inch (2.5 cm) larger than your desired block size.
I used an irregularly shaped piece of yellow taffeta from my daughter's bridesmaid dress to make my first patch. I laid the taffeta on the background square, slightly off centre.
Adding the Second Piece & Pressing

I cut a rectangle of gold-spotted cream fabric, allowing a quarter-inch seam allowance. Then I laid it on top of one of the edges of the first patch, right sides down. With it pinned in place, I stitched the pieces together with back stitch. You could use your sewing machine.
I finger pressed the seam and trimmed off the edge. Then, I unfolded the fabric and pressed it flat.
Next, I turned the foundation square one-quarter turn to the right.
Pressing Tip
I like to keep a folded terry towel on my worktop so that I can press as I go along. After pressing each seam, turn the foundation square one-quarter turn to the right before adding the next patch.
Adding a New Piece of Fabric
I chose the strawberry fabric as the next to include in my crazy quilt block. The pattern had the benefit of giving me a nice straight line to stitch my seam along.
This patch overlays the edges of both existing patches. I stitched and pressed the seam as before.


I pressed the seam and trimmed off the extra fabric. Then, I turned the growing crazy quilt block ninety degrees.
Adding the Next Patch
I use tailor's chalk, or a disappearing ink pen, to mark the seam allowance on darker, plain fabrics if needed.
This next patch sat alongside the original central patch. I continued the seam until I had joined it along the entire length of the first and the existing patches.


Don't worry about that little section of strawberry fabric sticking out. I cut that off afterward.
After pressing the seam, I cut the pink rectangle at an angle. I did this to add variety to the shapes in my finished project. I left the trimmed section beside the patch so that you could see what I removed.
Continue to Add Further Patches
I made this next patch from a nightdress my daughter used to wear when she was a toddler.
This rectangle lay along the fourth edge of the yellow patch. It lay on top of the pink patch, fitting along the edges of both.


Adding a Longer Strip of Fabric
With this patch, I moved on to longer strips. This one fits along the edges of the central yellow patch, the spotty piece, and also along the one I added above.
I picked a piece of fabric from an old blouse that I tie-dyed back in the 1970's for this patch. I positioned it so that the creamy coloured area met the last patch's print and the yellowy/orange part met the cream spots.

Patches numbered in the order they were added
This patch completed my first "journey" around the crazy quilt block. I still turned the block a quarter turn after attaching each strip.
In the photo, you can see that the "nightie" fabric took me to the edge of the foundation square on that side of the yellow shape. This won't always happen. Normally, you would keep adding patches all around in a second journey.
For this block, I only needed to add shapes to the existing patches on four sides.
Starting the Second Round of Patches
In this photo, I have numbered the patches in the order that I attached them. As you can see, I stitched the green patch (from my daughter's old skirt) to patches 2, 3, and 6.
I shaped this patch to an angle after stitching and pressing.

Adding Longer Pieced Strips
The next patch will lie alongside patches 3, 4 and 7 and so will be longer. To avoid my crazy quilt block ending up looking stripy, I seamed two fabrics together for this length.

I was careful when I attached this strip to the block. I made sure to avoid matching its seam with any others on the block.
Piecing on the Diagonal
Again, for this strip I pre-seamed two fabrics together; this time on the diagonal.
I did not trim the patches to shape first. Instead, I laid the new strip in place along patches 4, 5, and 8. I stitched it and then trimmed the excess from the previous patches. I wanted to create a triangle from the existing dark pink patch.


As you can see in the photo, I put the printed fabric in this strip next to the solids in the existing crazy quilt block.
Adding One Last Long Pieced Strip

For the last strip, I seamed the dark green and strawberry fabrics together. Then, I stitched them to patches 6 and 7.
The corners were all that remained.
Completing the Corners of the Crazy Quilt Block
When adding the corner pieces, I tried to ensure that the patches were different shapes and sizes. I balanced the existing dark pink patch with a second piece of that fabric in the bottom right corner. I used the light pink and cream spotted fabrics for the remaining corners. I also used the "nightie" fabrics again.
The last job was to trim the overhanging patch edges. They should be even with the foundation square. Now, the block is ready for the decorative stitches.
Once your block is pieced, the next step is embellishing the seams with embroidery stitches. You can also add French knots as scattered accents and blanket stitch along the outer edges.
And that's your block, pieced and ready for embroidery!
Design Your Own Crazy Quilt Block
Drag the starter patch to position it. Drag the corner handles to reshape it. Avoid very thin or pointy shapes. Then click Fill My Block.
Ready to Embellish Your Block?
I created this quilt block using the stitch-and-flip technique of crazy patchwork. I hope the step-by-step photos and instructions have helped you see that piecing your blocks is simple and lots of fun.
Now it's your turn!
Embroidery Stitches
Decorate your seams with beautiful crazy quilt embroidery stitches.
Start embellishing →More Crazy Quilting Ideas
If you get stuck, find more crazy quilting ideas and inspiration here.
Get inspired →You might like these
Crazy Quilt Embroidery Stitches: Seam Treatments (List)
Use crazy quilt embroidery stitches for seam treatments: feather, herringbone, chevron, cretan, bullion knots and more—plus motif ideas and materials.
Crazy Quilting Ideas: Before & After a Block Makeover
See how my crazy quilting ideas changed mid-project: swapping fabrics, adding motifs and stitching seams to tie a block’s story together.
Hanging a Quilt with Flair - Drawer to Decor Creative Display Guide
Hanging a Quilt Collection with Imagination - Discover Unique Ways to Display, Preserve, and Enhance Your Quilt's Beauty


Stay connected between projects
If you’d like occasional updates from my embroidery room, including new patterns, gentle tips, and little things I think you might enjoy, you’re warmly invited to join the Stitchin’ Times newsletter.
About Me - Contact Carol - Privacy Policy - Site Map - Testimonials
Please do not copy the content of this site. It is protected by Copyscape.
Copyright © 2006- www.needlework-tips-and-techniques.com All rights reserved