- Home
- Whitework Sampler
- Three Sided Stitch
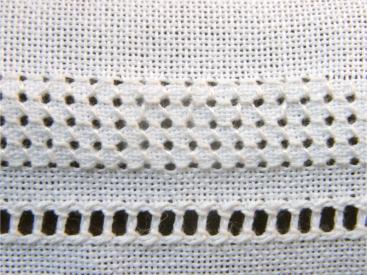
Three sided stitch and ringed backstitch
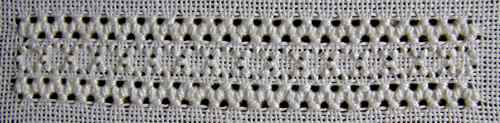
This penultimate band in our whitework sampler uses two stitches, three sided stitch and ringed back stitch, in combination.
The sampler was first released band-by-band in my newsletter, Stitchin'Time. You can sign up for the newsletter at the bottom of this page.
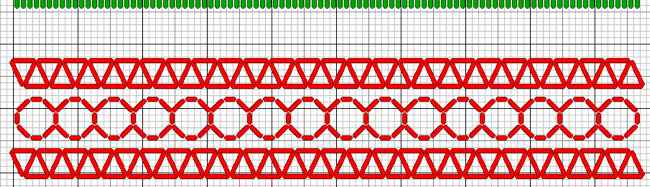
The chart below includes the very bottom of last month's band so that you can line up this next band properly.
As before you can ignore the colours on the chart, they are there just to make it easier for you to follow the chart, not to signify the colour to use for your stitching.
Three sided stitch
This is a really useful stitch to have in your library as you can also use it to finish the edges of your work. It makes a solid line with large, well-defined holes. We are using two rows, top and bottom, in this band.
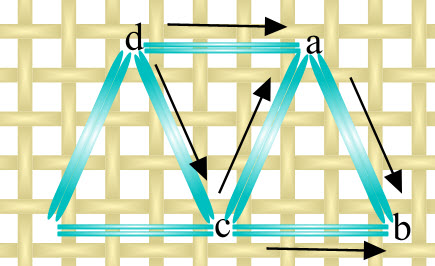
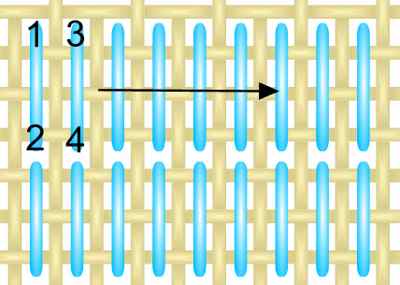
We will work this stitch from right to left following the diagram left, pulling each stitch firmly to ensure the holes are really visible in the finished band. This row begins 8 threads down from the previous band.
* Start by bringing your needle up at (a) and take it down again at (b), four threads down and two to the right.
Repeat this stitch and bring the needle back up at (c), which is four threads to the left of (b). Reuse hole (b) to make the first stitch in this position, and then repeat, bringing the needle back up at (c).
Take your needle down at (a), back up at (c) and repeat. Next go down at (a) and back up four threads to the left at (d).
Work two stitches from (d) to (a) to complete the second triangle of the row.
To continue repeat from *, where the next stitch (d to c on the diagram) is the same as from (a) to (b). Carry on in this manner across the row.
Ringed back stitch
Between our two rows of three sided stitch we will add a more delicate pulled work stitch. Ringed back stitch produces a wider line, which can also be used for borders. There are a number of different ways to stitch this, the instructions below show my favorite method.
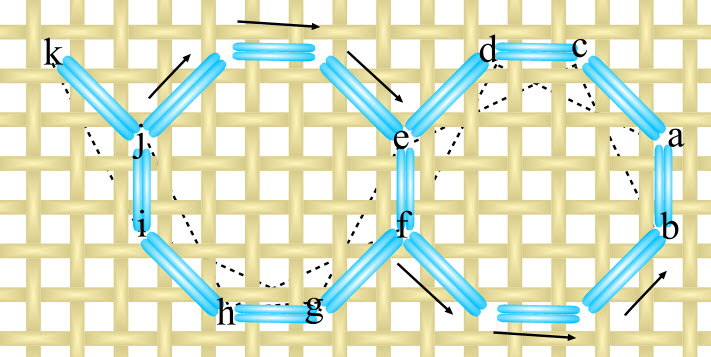
Again we are working from right to left, with each stitch going over two fabric threads. We will complete half of the first "circle" and then the alternate half of the next.
Start by coming up in hole (a) and going down, two threads lower, in hole (b). Repeat.
Bring the needle back up in hole (c), two threads above and to the left of hole (a). Take it down again in hole (a). Repeat.
Come back up at (d) and down at (c). Repeat.
Can you see that we are basically doing back stitches?
The dotted lines on the diagram above show where the thread is carried across the back of the fabric. These threads help to make the centers of the rings more dense, while they are not carried behind the holes we are creating.
Continue following the diagram, each time working the stitch in a backwards direction, to complete the first half of the row. At this stage you will have a wavy line, which is made into rings when you change direction and work your way back again, completing each ring in turn.
Remember to stitch the second row of three sided stitch below and then this band of the sampler is completed.
You might like these
Creating Your First White Work Sampler - From Thread to Treasure
Explore the intricate art of whitework embroidery through our step-by-step tutorial. Ideal for beginners, this guide will take your skills to the next level!
Drawn thread work - Whitework sampler band 2
We will learn drawn thread work in band 2 of our stitchalong whitework sampler. Find out the difference between pulled work and drawn thread needlework
Band 5 of the white work embroidery sampler
Are you stitching along with my white work embroidery sampler? Come on, join in, and learn new needlework techniques with us. Its free!
Copyright © Carol Leather - 2006-2024
About Me - Contact Carol - Privacy Policy - Site Map - Testimonials
Please do not copy the content of this site. It is protected by Copyscape.