Handmade greetings cards for stitchers
Handmade greetings cards have been making a comeback in recent years, and it's easy to see why.
In a world dominated by digital communication, there's something refreshing and special about receiving a physical card that someone took the time to create by hand. It's a delightful reminder that there are still people out there who value old-fashioned sentiments and meaningful connections.
Whether you're a craft enthusiast looking for a new hobby or someone who craves a break from the digital noise, handmade stitched greetings cards offer a unique and personal touch that captures the attention and hearts of many.
So next time you're in need of a card, skip the generic ones and opt for something handmade – it's like sending a small piece of art through the mail. The recipient will surely appreciate the effort and the smile it brings to their day.
So next time you're in need of a card, skip the generic ones and opt for something handmade – it's like sending a small piece of art through the mail. The recipient will surely appreciate the effort and the smile it brings to their day. If you are an avid stitcher, then mounting your work in a 3 fold aperture card is an ideal way of finishing off small projects.

Choosing the right card
Choose an aperture shape that compliments the basic shape of your cross stitch design and ensure that the design you pick will fit within that shape. If it looks like being a tight fit, then you may want to consider stitching it on a embroidery fabric with a higher thread count, as this will mean the finished design is slightly smaller.
Also give some consideration to the color of the card. Do you want it to blend or contrast with the stitched design? If you are creating a Christmas card you might like to pick a traditional red or green card whereas for a ladies birthday card you might prefer something softer and more subtle.
Once you have picked the right aperture card, ensure you have a supply of double-sided tape, sharp scissors and enough room to do the job.
Mounting the embroidery in your handmade greetings cards
To ensure that your handmade greetings cards look their best it is important to attach double-sided tape all around the inside of the aperture, so that the fabric is held securely, without gaping.

Then peel off the paper backing from the tape, exposing the sticky surface.

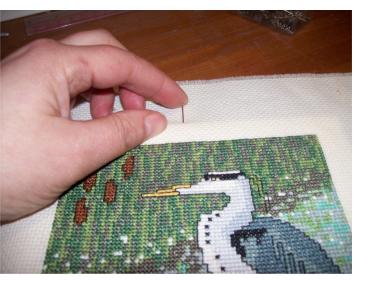
Lay your embroidery on a flat surface, right side up. Then carefully lay the sticky side of the card on top, ensuring that the design is where you want it. I like to leave a little extra headroom if the design is of a living creature, like the cat I am using in this example.
Gently press the card down all around the aperture to make sure it is attached firmly. Then turn the work over.
You may now find that the fabric overhangs, or is really close to, the fold line of the card. If so, just trim away a little of the fabric to ensure it fits comfortably.

Next, attach double sided tape to the inside front of the card, around the outside edges, and peel off the paper backing.

Fold the center panel of the card down over the taped one, and press firmly (with clean fingers!!) to ensure it sticks firmly all around.

You can then either write your greeting directly on the inside of the card, or print off a greeting from your computer onto white paper and stick that down the center of the card with more double sided tape. I still like to handwrite a personal greeting on the inside of my handmade greetings cards underneath the printed wording.
Lorraine's aperture card

Lorraine mounted this little field mouse in an aperture card and then embellished it with leaves and acorns.
Click to see more of her handmade cards.
Two fold cards
If you find it difficult to obtain three panel cards with an aperture you can use a single fold card and attach your stitching to the outside after fraying the edges.
This time it can be easier to put the tape on the back of the stitching rather than directly on the front of the card. Try to position the stitched piece either straight, or deliberately "wonky" otherwise it can look as though you didn't take quite enough care.
There are a number of free designs on this site which you could use to make your own handmade greetings cards for different occasions...
- Free cross stitch patterns
- A cute mouse in a tea cup (pdf file)
- A rose in assisi work
- A bargello Christmas bell
Handmade greetings cards, particularly those with stitched designs, not only bring a touch of personal connection but also a unique artistic flair to the age-old tradition of card giving. The process of making them might seem intricate, but it's a labor of love that results in a delightful piece of art. It's a hobby that allows for creativity, and the end product is something that brings joy to both the creator and recipient.
In a world where digital messages are prevalent, let's take a step back and remind ourselves of the charm and warmth of personal, handmade greetings. Choose to create rather than consume, to add that personal touch rather than opting for the generic. Whether it's a heartfelt message on a birthday card or a festive wish on a Christmas card, your handmade stitched greetings card is sure to stand out and make a lasting impression.
So, go ahead, pick up that needle, choose your design and aperture card, and start stitching. It's time to create something beautiful and personal that transcends the ordinary. Be it a cute mouse in a teacup or a bargello Christmas bell, your creation will surely add a spark of joy to someone’s day.
Let's keep the art of personal connection alive, one handmade card at a time. The world needs more smiles, and your cards can surely bring them.
You might like these
Needlework Finishing Techniques: Expert Tips for a Professional Finish
Needlework finishing techniques can take your projects to the next level. Discover creative ideas for finishing your embroidery in our guide.
Cross stitch card making ideas
A visitor to the site, Rachel, shares one of her cross stitch card making ideas
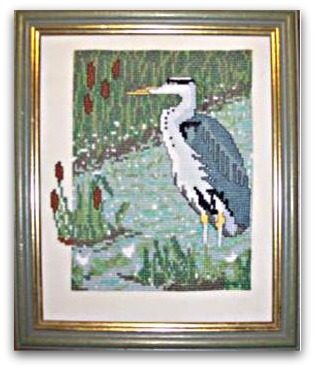
Framing cross stitch and blackwork
Illustrated step by step instructions for stretching and framing cross stitch and blackwork projects. Learn how to frame needlework the easy way

Copyright © Carol Leather - 2006-2024
About Me - Contact Carol - Privacy Policy - Site Map - Testimonials
Please do not copy the content of this site. It is protected by Copyscape.