Chain stitch tutorial - little fishy
Once you dive into the world of chain stitching, you'll find yourself swimming through a sea of creativity.
Whether you're a seasoned embroiderer or just starting out, the charm of chain stitching is undeniable. But what if I told you that you could add a touch of humor to your chain stitching projects?
Get ready to reel in your imagination because we're about to embark on a fishy adventure.
In this step-by-step tutorial, we'll explore the fascinating art of chain stitching with a quirky twist – a fish! With just a few simple stitches, you'll be able to create adorable little fish design that will make a splash on any fabric. So grab your embroidery hoop, needle and thread, then let's dive right in!
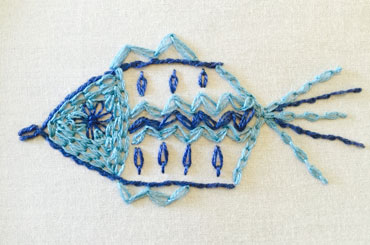
This little fishy project could get you hooked on the many variations of the chain stitch that are out there.
In this one simple motif, you can explore six different forms of the basic stitch! They are...
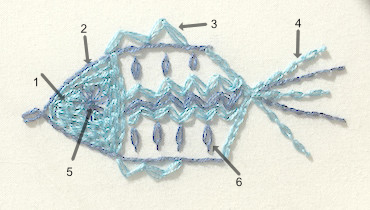
- basic chain stitch (opens a new page)
- twisted chain stitch
- zig-zag
- cable chain
- detached chain (opens a new page)
- detached chain stitch with tail
Pattern and materials
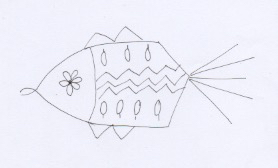 Printable pattern
Print this page and then transfer the pattern onto your fabric.
Learn about iron-on transfers and other methods of getting your pattern on the fabric.
I suggest a firmly woven cotton or linen fabric for hand embroidery.
You will also need an embroidery needle, hoop, and two shades of stranded embroidery floss. (I used 2 strands throughout).
You will find instructions for basic chain stitch by clicking on the link in the list at the top of the page.
Also on that page you will find instructions for detached chain or lazy daisy stitch. This is used to create a daisy for your fish's eye and for decorating his body.
This current page explains how to work the other variations of this basic embroidery stitch.
Twisted chain stitch outline
We will use twisted chain stitch for the dark blue outline and the two dark lines in our fish's tail.
Time to outline our fishy friend's body and head. Thread your needle with two strands of embroidery floss. (I am using a thicker thread in the photos below so you can see it better.)
Begin at the back of the body, working from left to right. If you are working in the hoop, don't stretch the fabric too taut. A little "give" helps here. Try to keep your stitch length even throughout if possible.
 Fig 1 - Twisted chain stitch
For your first chain stitch bring your needle up through the fabric at the beginning of your outline. Insert it again right next to the original spot and bring it through the fabric about 5mm further along. Don't pull it through completely just yet.
Take your working thread across the needle, and under the tip, to create the twist. Then pull it through.
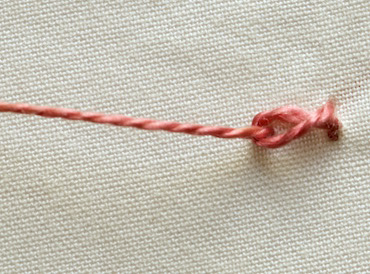 Fig 2 - Twisted chain stitch
The next photo shows how your work will look at this point. It almost resembles a little fish itself, doesn't it?
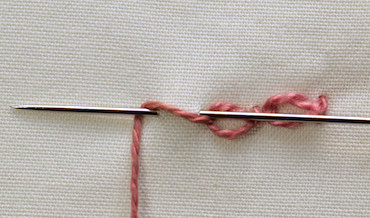 Fig 3 - Twisted chain stitch
Continue in the same manner around the outline of the fish's body and head. When you reach his mouth, fasten off by taking the needle down outside the loop. Then start again for the bottom lip. This is to give him an open mouth.
Take your needle down just outside the first loop and back up on the outline about 5mm further along. Again twist the thread around and under the tip of the needle. Then pull it through.
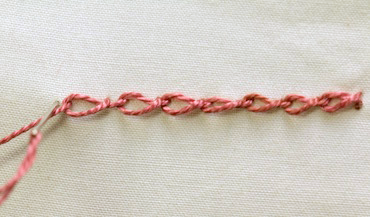 Fig 4 - Twisted chain stitch
Here is my finished row of twisted chain stitch in the sample thread.
When you have outlined the body and head, also stitch the two lines of twisted chain in the tail.
Don't be afraid to practice on spare fabric before working on your fish.
Zig zag chain stitch decoration
Used for the decoration inside the body, as well as the fins, the zig-zag chain is a decorative variation that is easy to work.
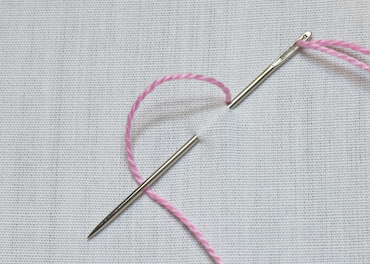 Fig 1 - zigzag chain
Take two tiny stitches to anchor your thread, then bring the needle up on your first dot. Insert the needle beside the thread and bring it back up on the next lower dot. Take the working thread under the needle, then pull the needle through.
At this point I turn my hoop around so it is more comfortable for me to work on the next stitch.
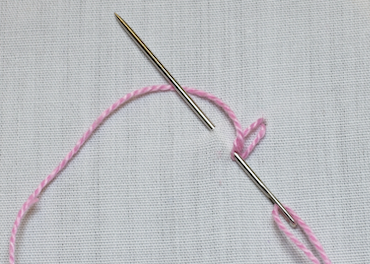 Fig 2 - zigzag chain
The trick to zigzag chain stitch is to pierce the thread of one stitch when doing the next. This keeps the angles of the stitches correct and in place.
So take the needle down through the thread of the first stitch and up at the next top dot. Pass the thread under the needle and pull through.
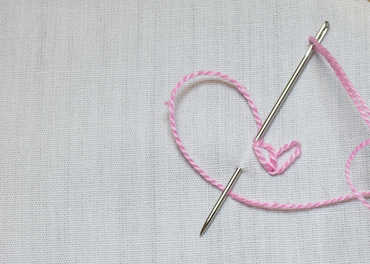 Fig 3 - zigzag chain
For the next stitch do the same thing, pierce the previous stitch and use the next dot along the bottom row.
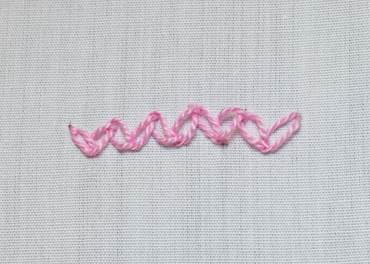 Fig 4 - zigzag chain
Here is my finished row of zigzag chain stitch. To complete it, take the needle down just outside the loop of the last stitch. Work three rows inside the fish's body, in alternate colors.
Do you see how much more even this row appears than the rows in my fish? Marking those dots sure helps!
Another hand embroidery stitch that gives a similar effect is herringbone stitch.
Cable chain stitch tail
The turquoise lines in the tail use cable chain. Close up it appears to resemble a length of chain links. This is one of those embroidery stitches that looks complicated but is fairly easy to work.
Again marking off equidistant dots, with either a sharp pencil or a disappearing ink pen, will help you keep the size of your stitches even.
Start with a normal chain stitch.
 Fig. 1 - Cable Chain
This is the tricky bit to photograph and explain, but trust me, not that difficult to stitch.
In the photograph, the needle is going to the back of the work just outside the first chain stitch. We then wrap the thread around the needle.
Don't pull it all the way through at this stage, though.
 Fig. 2 - Cable Chain
Bring the point up on the next dot along your line. Wrap the thread under the needle tip and then pull it through.
This creates a little knot that holds the first stitch in place, while making the second chain stitch.
 Fig. 3 - Cable Chain
Repeat the normal chain and knotted chain in between along your row.
 Fig. 4 - Cable Chain
I took this photo of the completed line of stitches from above. Do you see how the little knot stitch forms a link between the chains?
 Fig. 5 - Cable Chain
Detached chain with a tail
We'll create the tree like shapes within the fish's body with detached chain stitches. The link at the top of the page will explain the basic stitch, you will just make a longer tie down stitch to give the tail.
The fish's eye and head
Following the instructions for the detached chain stitch (or lazy daisy), create a flower of petals for the eye.
In my fish I used a single strand, but in hindsight it would have shown up better if I had used two.
When the eye is complete, fill the rest of the head with rows of basic chain.
Well done!
You've successfully navigated the waters of embroidery and created an enchanting little fish using several chain stitch variations.
This project wasn't just about learning new stitches - it was about releasing your creativity, exploring the depths of your imagination, and most importantly, having fun while doing it. Remember, every stitch you made, every twist and turn you navigated, was a step forward in your embroidery journey.
Now that you've mastered several variations of the chain stitch, dare to dive deeper. Don't stop at this little fishy - the ocean of embroidery is vast.
Use the skills you've honed here to create your own embroidery masterpieces. Whether it's a school of fish or a completely different design. Remember, the world is your oyster, and you're just one stitch away from creating a pearl.
And don't forget to share your chain stitch creations! Inspire others just as you were inspired. Show them the joy and satisfaction that comes from creating something beautiful with just a needle, thread and variations on the simple chain stitch.
You might like to check out my other free embroidery designs on the site.
You might like these
Learn two variations of Fishbone Stitch - flat and raised
Learn 2 types of Fishbone stitch to add to your range of basic embroidery stitches
Padded Satin Stitch Initial
Satin stitch tutorial showing a padded initial being embroidered
Stitch a French knot the easy way with this step by step tutorial
The best way to stitch a French knot without getting in a tangle. These clear instructions and video will show you how its done


Copyright © Carol Leather - 2006-2024
About Me - Contact Carol - Privacy Policy - Site Map - Testimonials
Please do not copy the content of this site. It is protected by Copyscape.